If there were Squash Superlatives, the beautiful butternut is definitely taking "Most Popular." No matter what you do to butternut squash - roast it, steam it, spiralize it, bake it, boil it, mash, or even stuff it full of, or into, something else - it comes out first in class every time. Explore our favorite methods and learn how to cook butternut squash like a pro!

Jump to:
- Butternut Squash Benefits
- Shopping and Storing
- How to Peel and Cut Butternut Squash
- How to Roast Butternut Squash (Diced)
- How to Roast Butternut Squash (Halves)
- Diced Instant Pot Butternut Squash
- Whole Instant Pot Butternut Squash
- Diced Slow Cooker Butternut Squash
- Halved Slow Cooker Butternut Squash
- How to Use Cooked Butternut Squash
- Seasoning Suggestions
- Storage Tips
- More Butternut Squash Recipes to Love!
- How to Cook Butternut Squash
- Ratings
For almost my entire childhood, I only knew butternut squash as a pre-packaged frozen brick of orange mush. This delightful treat would, more often than not, come out around Thanksgiving, sometimes make another appearance or two before Christmas, and then *poof* vanish.
I remember finding a box in the back of the freezer in my teens, and feeling like quite the rebel for secretly microwaving it and savoring it alone in my room in like, May. Truly, it felt akin to the first time I snuck out of the house. (This is how nerdy for vegetables I am.)
It's only fair that I felt incredibly naive the first time I went to the market and realized: "Huh. Yeah. Butternut Squash... comes in... squash shape." But this epiphany introduced me to a whole new world where I could purchase, cook, and consume butternut squash any way I wanted it, any time I wanted it.
Better yet, I still enjoy it every single time with the same absurd joy of that teenager who "got away with" eating one of her favorite (and, let's be clear, readily-available and non-seasonal) holiday treats.
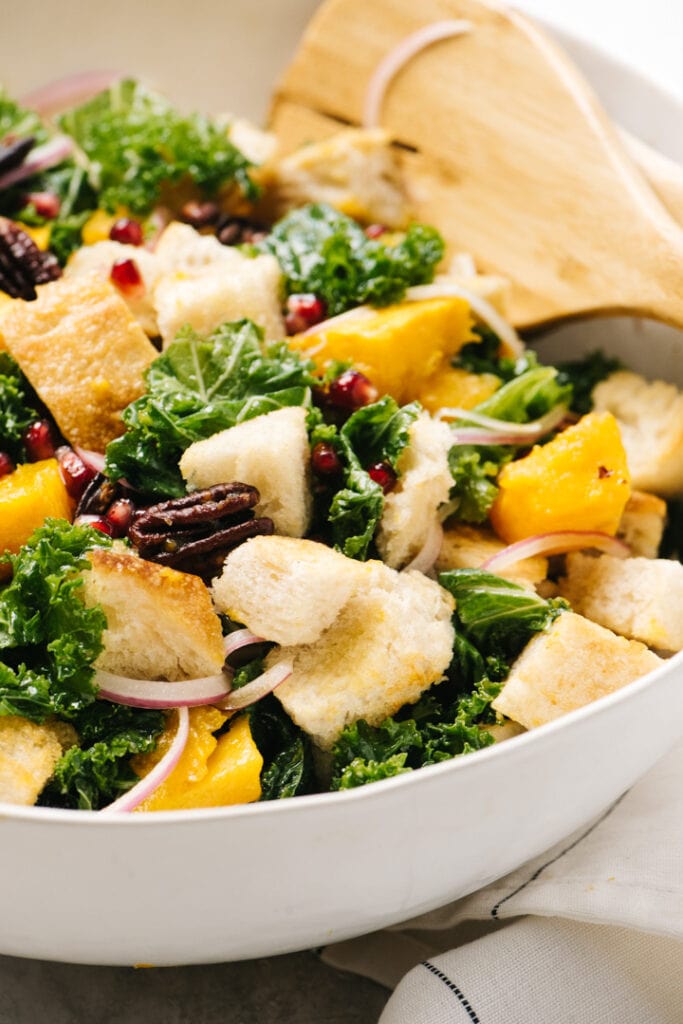
Most of us find our way to a bowl of butternut squash soup at some stage in our lives, but that's really just the beginning. That being said, before we get to delights like butternut squash mac and cheese, butternut squash fries (yes, those kinda fries!), butternut squash noodles, and even butternut squash panzanella, we've gotta roll it back to the basics.
Let us start at the very, very beginning and explore every simple way to cook butternut squash. From there, let your creativity be your guide in the kitchen! (Psstt...pass me a slice of that butternut squash galette, because now I'm hungry!).
Butternut Squash Benefits
In case you need more than one reason to love this technically-a-fruit-not-a-vegetable, butternut squash is a favorite for several reasons:
- Fit: loaded with vitamins (A and C), butternut squash is an incredible source of everyone's favorite antioxidant, beta carotene. While not "low carb," it's lower in carbs and way lower in calories than some of its starchier counterparts. Plus, tons of fiber.
- Flavorful: while all squash are delicious, butternut boasts that signature buttery, nutty, slightly-sweet flavor that I'm always amazed occurs in nature without much help needed. Sometimes a little salt and pepper is all it takes to coax it out.
- Flexible: butternut squash is supremely versatile when it comes to dietary restrictions. It’s obviously vegan and gluten-free, but also fits paleo and Whole30 diets. While not keto friendly, it has way less carbs than its starchy vegetable cousins (corn, potatoes, and even sweet potatoes).
- Foolproof: it’s pretty hard to mess up butternut squash. It holds up to just about any preparation and if you do happen to overcook it, simply puree it down for ravioli filling or soup, which is ALWAYS satisfying.
Shopping and Storing
Ready to take home a butternut squash of your very own? There are a few things you need to know first.
Where to Buy Butternut Squash
Butternut squash is usually harvested in late September through early October, and most garden experts agree it should be allowed to "cure" for a couple months after it's been picked. If stored properly, it can last quite a long time - up to 6 months when kept intact in a cool (50-55 degrees), dark, dry environment.
That being said, this longevity has been known to push some grocers to the (let's say) outer limits of food storage, and the squash you buy may have been harvested not-so-recently. That doesn't mean it's bad, it just means it may not be at peak freshness.
If you can find it at a farmer's market during peak season - and you have the right storage - you can pick up a recently harvested squash and cure it on your own for better quality control.
TIP: butternut squash freezes beautifully. So, whether you have fresh (or freshly cured) squash, or it's been in a root cellar for a few months, you can always opt to peel, cube, and freeze it raw for later use.
Choosing a Butternut Squash
The average weight of a ripe squash is around 2-3 lbs. Remember that you're going to lose a few ounces to prep, so factor that in when weighing. As with most produce, if you're nervous in the slightest about picking a superior squash, your own eyes and hands are the best gauge:
- Your squash should be heavy. (Frankly, it should be mildly annoying, cumbersome and need its own bag.) Like most vegetables, squash is mostly water, and that weight indicates the interior flesh is moist and ready to eat. Anything that lifts without resistance is probably past its prime.
- Check the hull for even coloring. It should be a consistent beige/tan. (It's perfectly fine if there's a lighter patch that indicates where the fruit rested on the ground.) Avoid streaks or brown spots.
- Check the skin for give. You want the shell to be hard. If your fingers can press in, pass it by.
- Scratches aren't a deal breaker, but avoid any gouges or punctures. (That's how mold and bacteria sneak in. Ew.)
- Check the stem (or stem area if it's been fully removed). It should be dried (i.e. crusty) with no signs of moisture or mold.
How to Peel and Cut Butternut Squash
While getting to the succulent flesh of a squash might appear daunting, it really only takes the right tools - and a bit of elbow grease - to dig in.
TIP: resistance is key so make sure to use a hard, but non-slip cutting surface. Place a silicone mat or damp towel under your cutting board to avoid unnecessary movement.
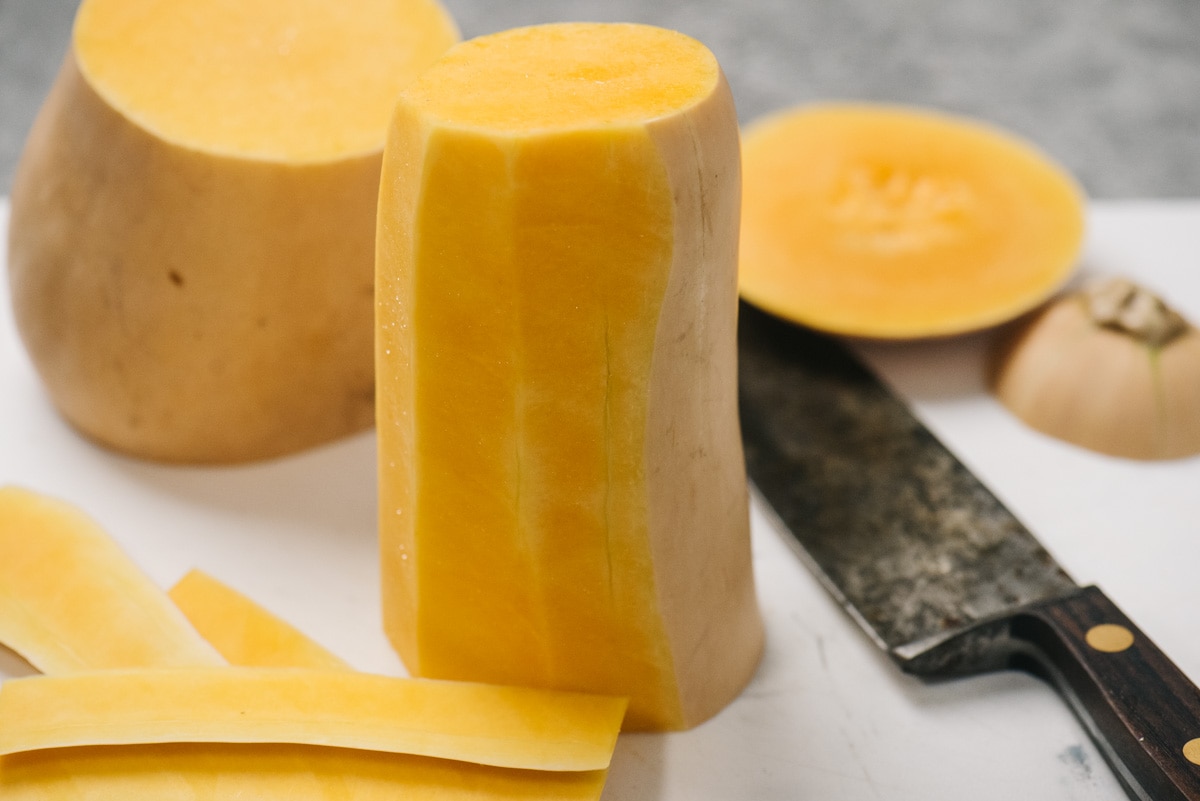

Peeling and Seeding
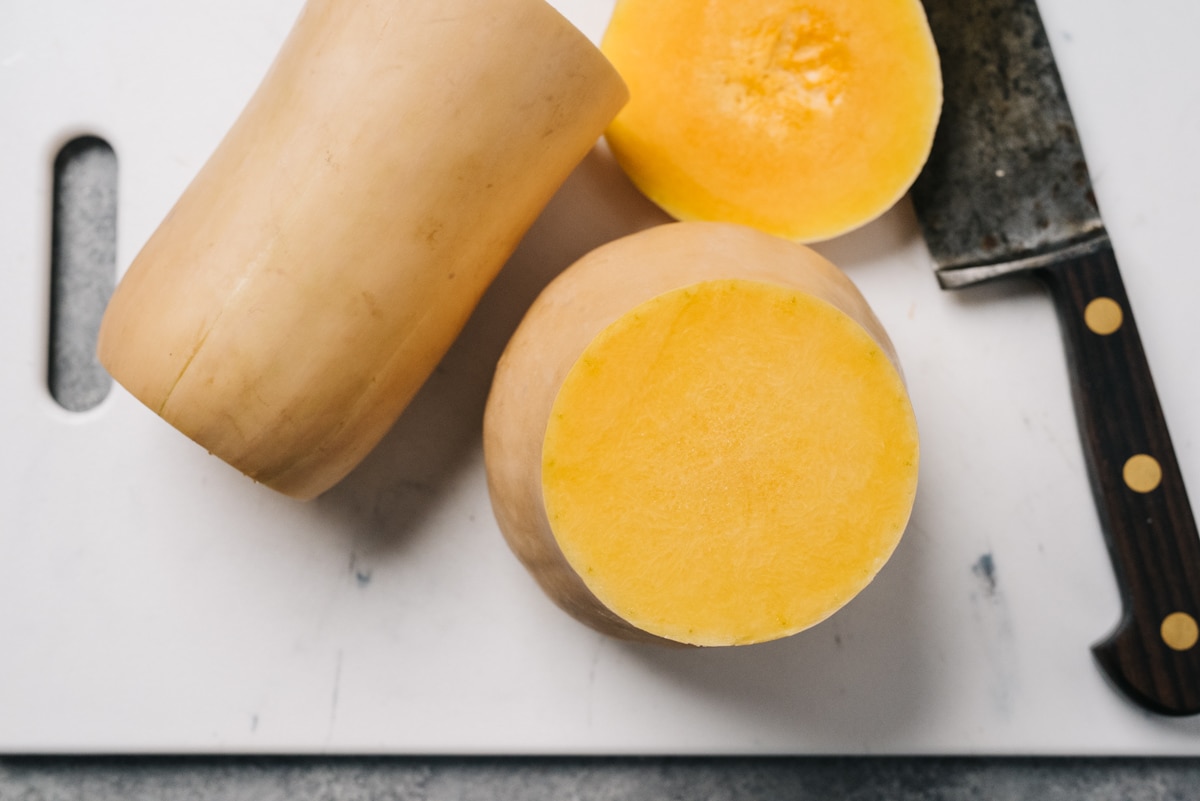
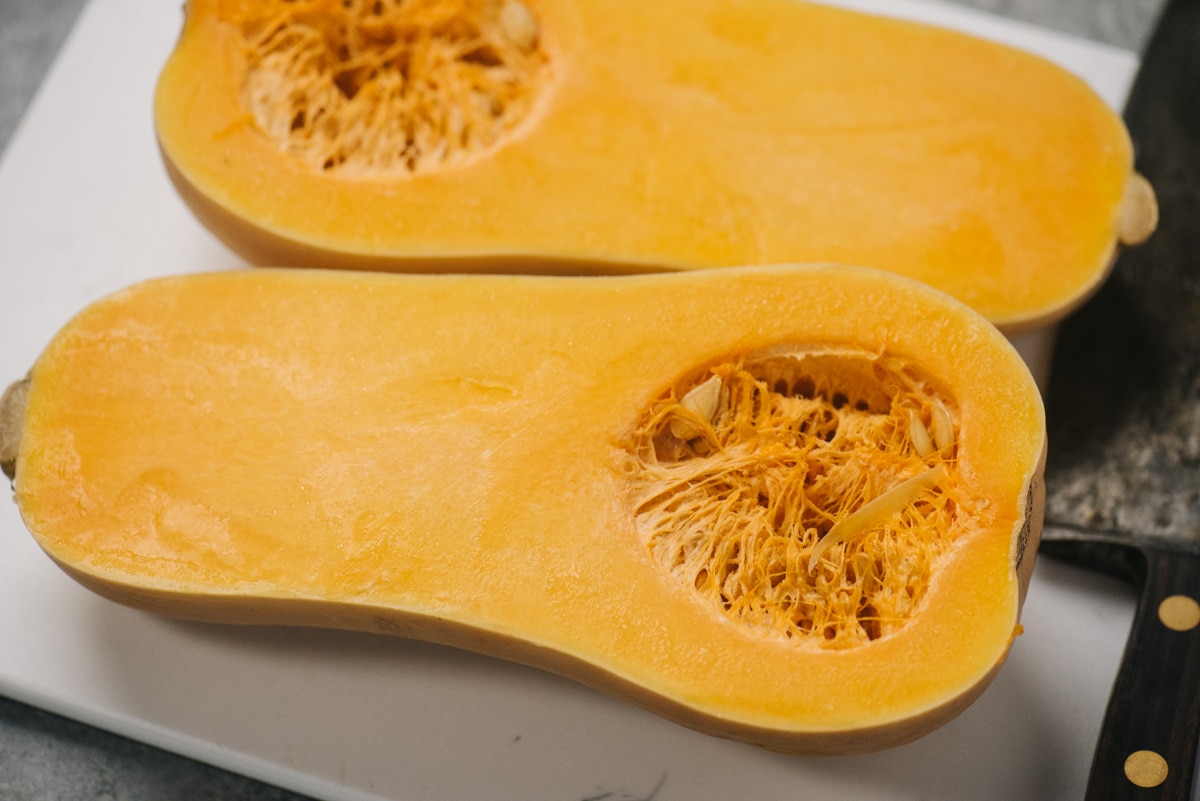
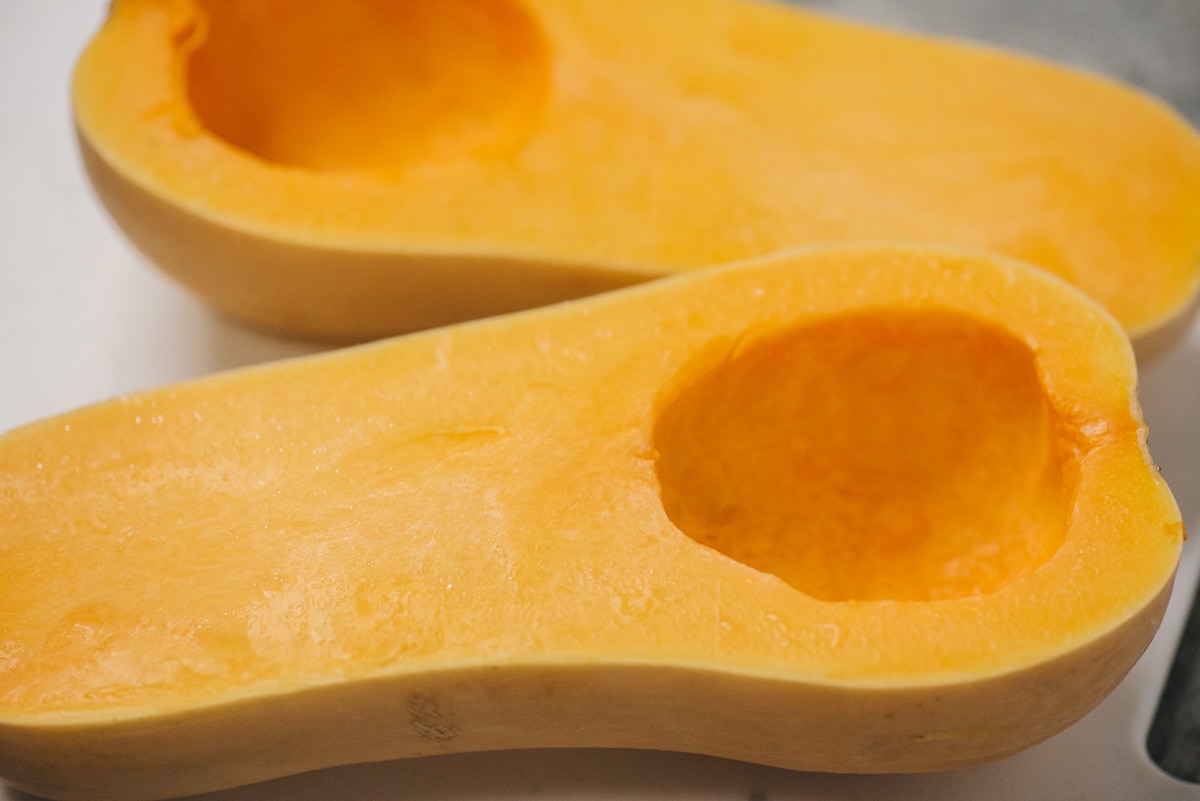
- Lay the squash onto a cutting board. Using a sharp chef's knife, trim ½" in from both end. Then slice to divide the neck from the base (where the seeds live).
- Peel the skin using a chef's knife or vegetable peeler. We find that a chef's knife will remove more skin more quickly, but a vegetable peeler may feel safer. To use a chef's knife, stand up the squash then slice off the skin from top to bottom.
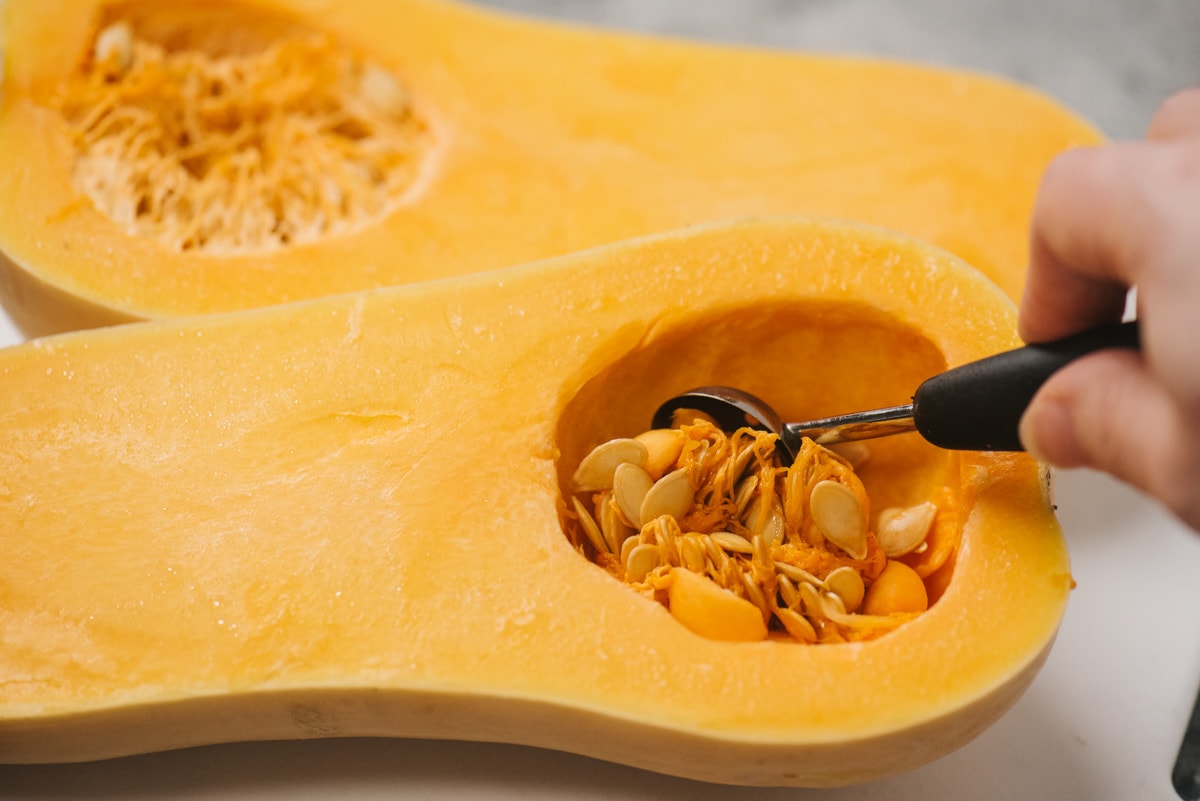
- Scoop out the seeds using a melon baller (our favorite tool), grapefruit spoon (with small teeth along the edges), or a regular spoon.
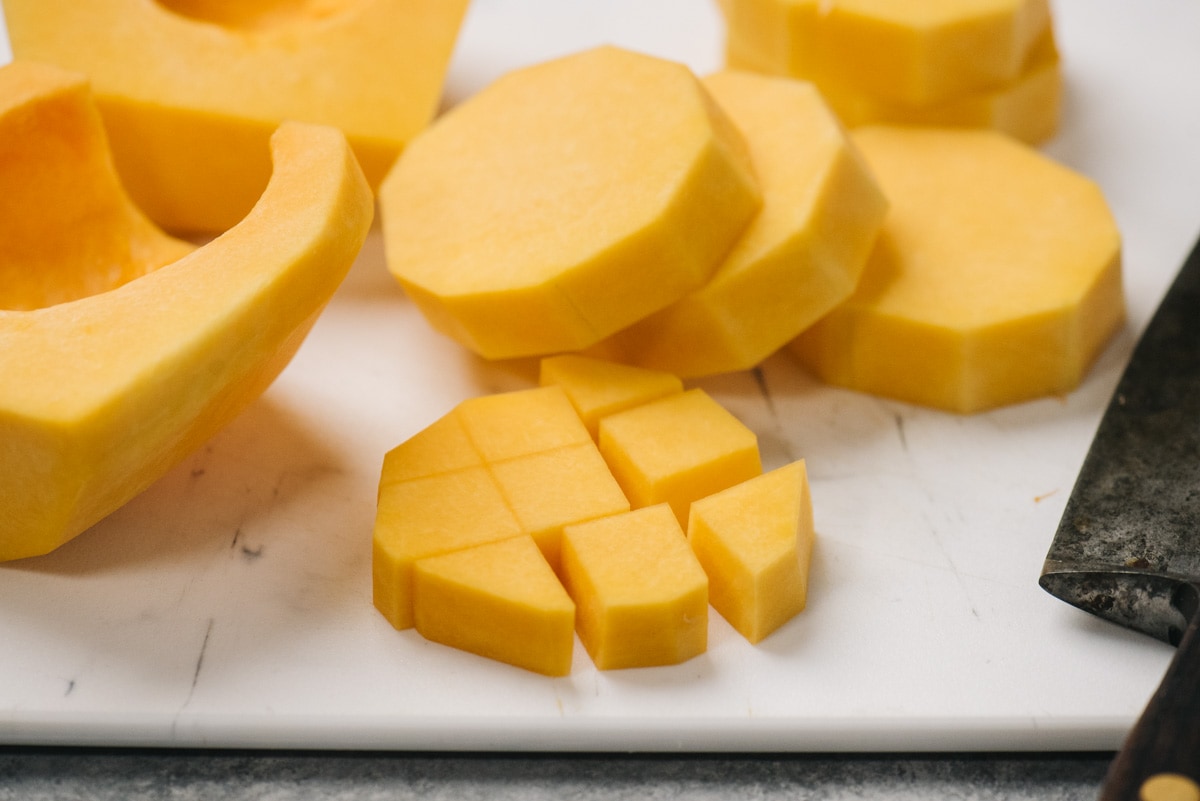
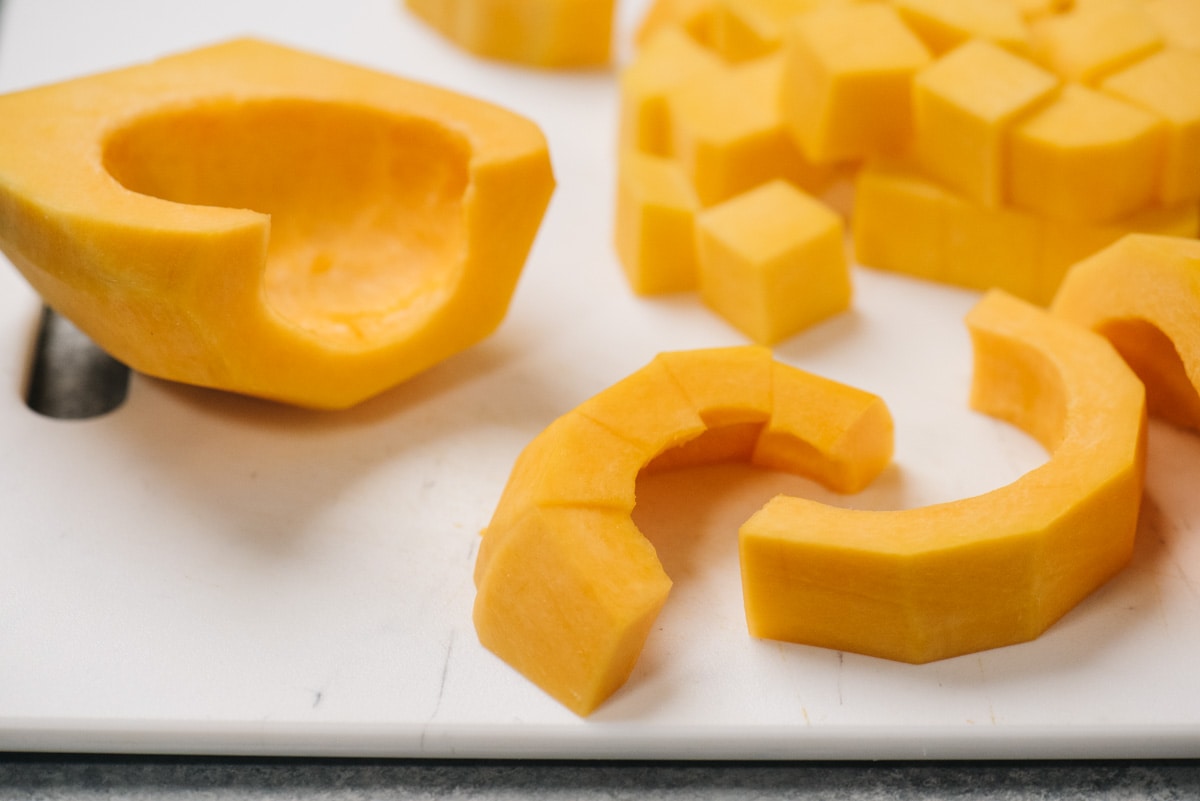

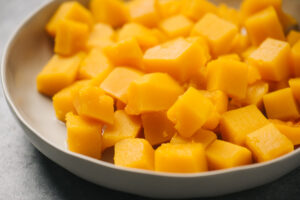
Dicing
- Slice the neck (non-seed) end into 1" thick round slices, then dice eat flat circle into 1" cubes.
- Slice the hollowed out base ends into 1" thick slices (they'll resemble half moons), then dice into 1" cubes.
TIP: the larger the dice, the longer it will take for the squash to cook. Aim for bite sized (1") pieces for relatively quick cooking that are versatile and easy to fork.
Prepping Halves
- Lay the squash onto a cutting board. Using a sharp chef's knife, gently, but firmly, slice through the stem and down the length of the squash to the blossom end. If you meet resistance and need to stand your squash on end to slice downward, I recommend microwaving first (see below).
- Scoop out the seeds using a melon baller (our favorite tool), grapefruit spoon (with small teeth along the edges), or a regular spoon.
TIP: microwave the whole squash for 2 minutes to slightly soften the skin; this will help with slicing through the squash. ALWAYS use a sharp knife - dull knives can slip and cause injury.
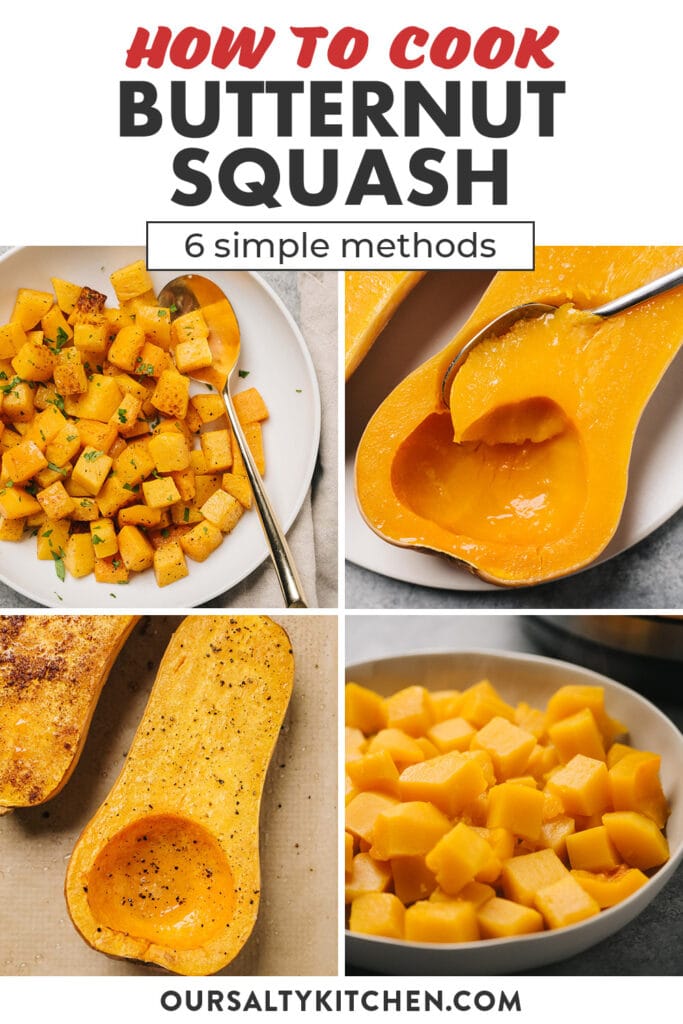
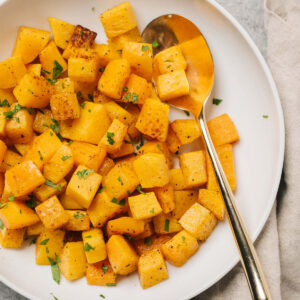
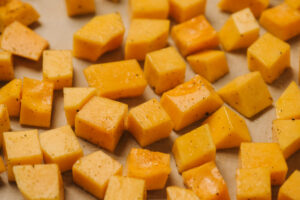
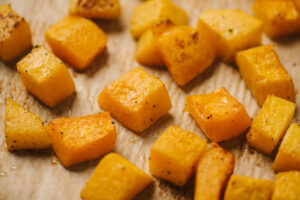
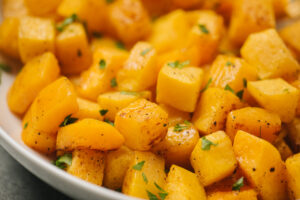
How to Roast Butternut Squash (Diced)
While my inner child still loves it mashed, adult me recognizes that roasted butternut squash is really the pinnacle of winter squash deliciousness. Dicing ensures you get more crispy, caramelized surface area for maximum eating pleasure.
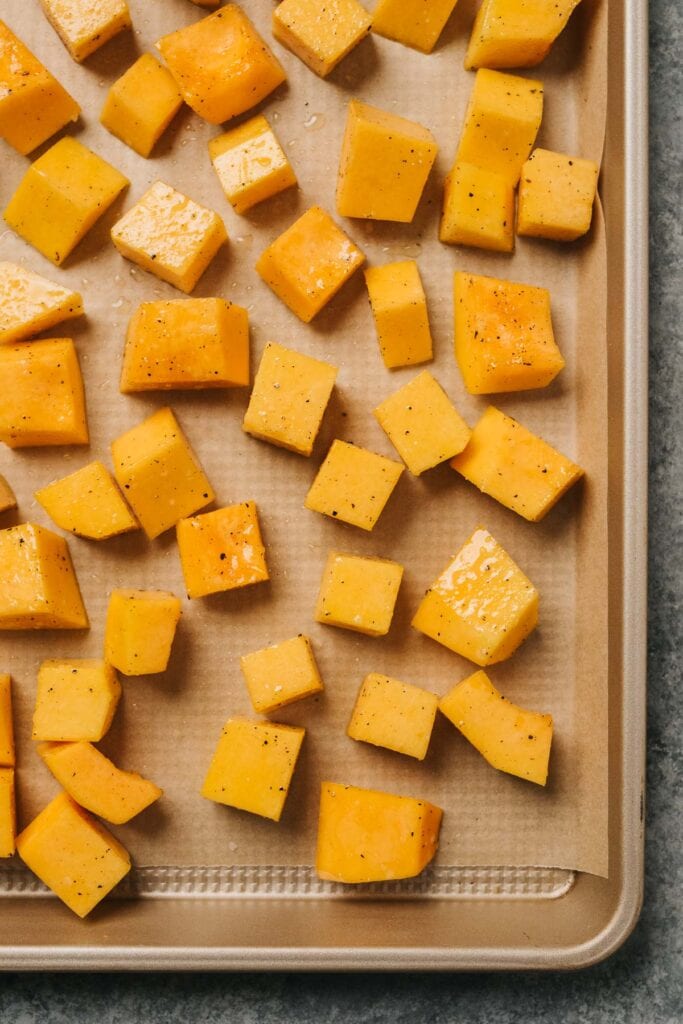
- Toss squash with the olive oil and seasonings in a large mixing bowl.
- Arrange on the parchment lined baking sheet in a single layer. Leave breathing room between the pieces.
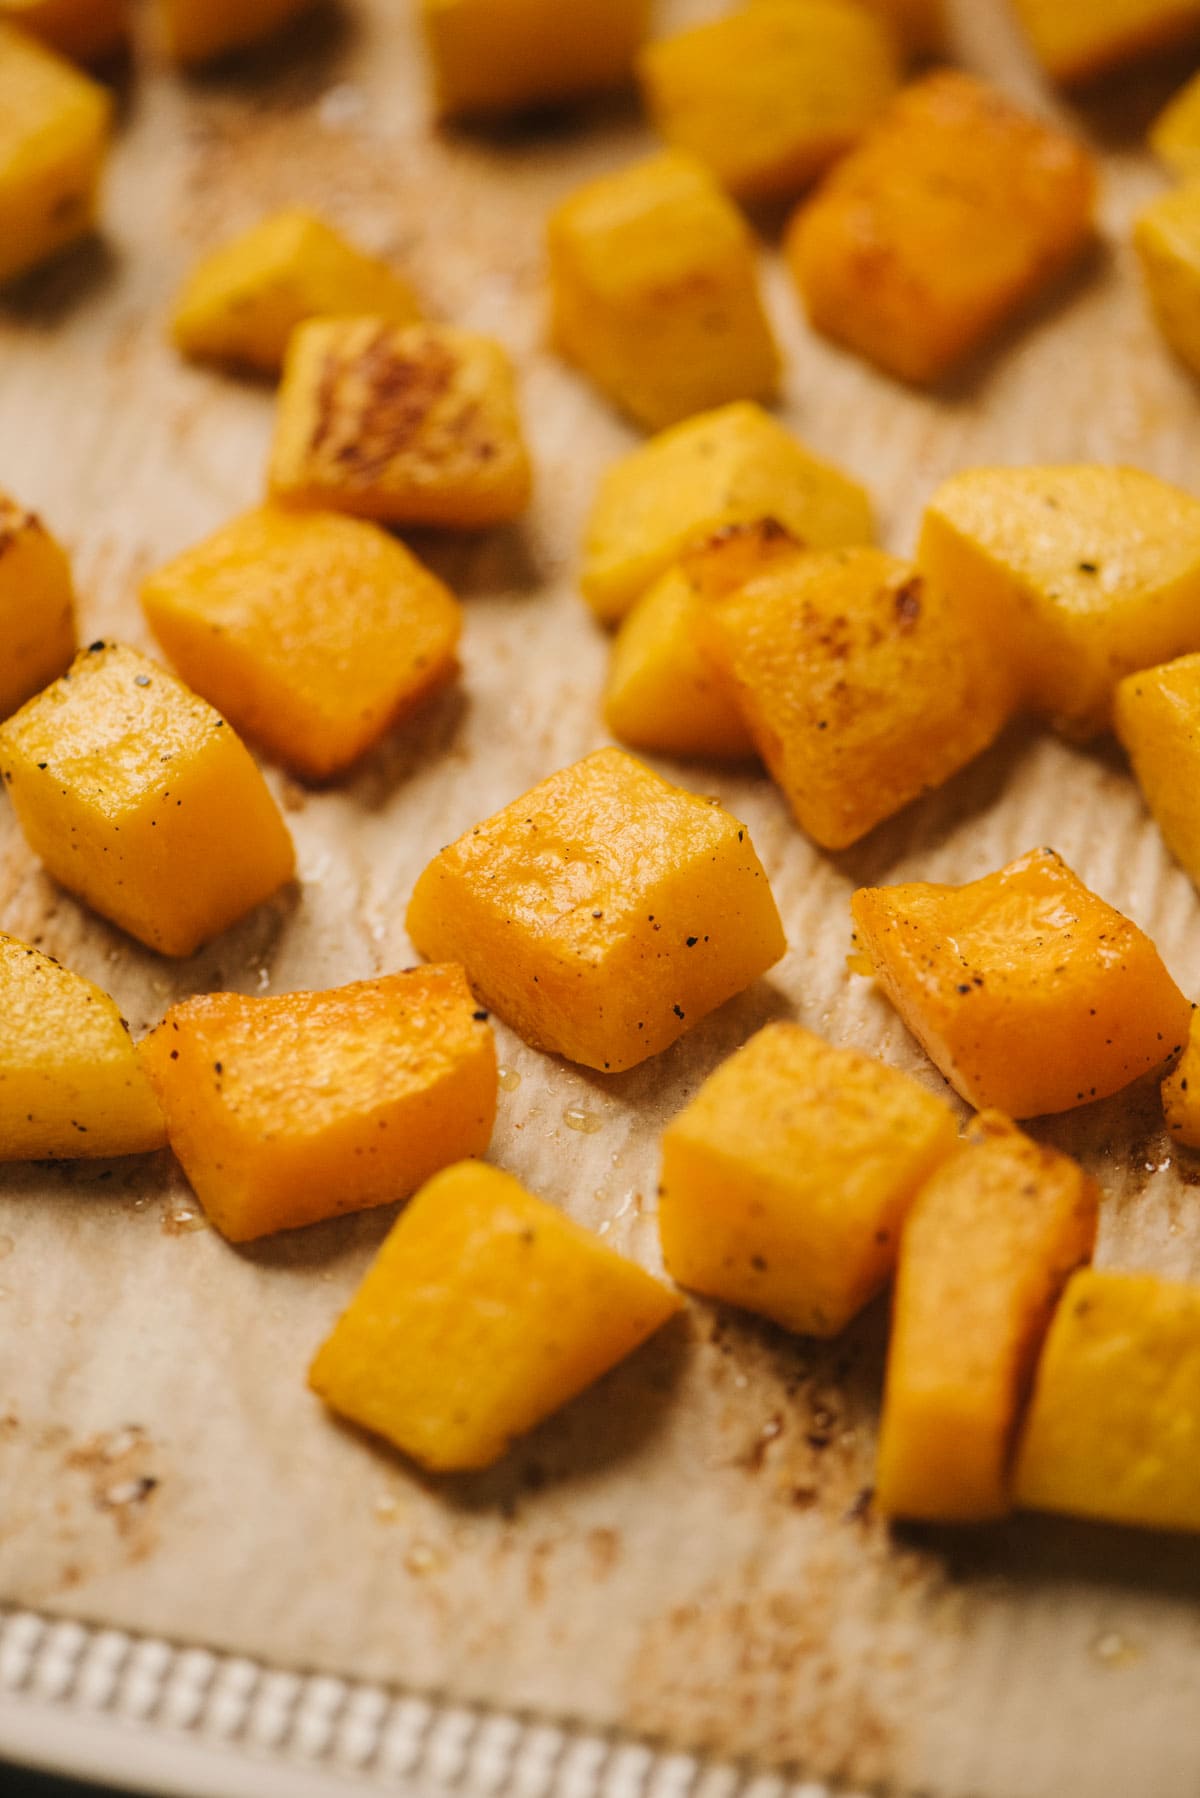
- Roast in a 400°F oven 30-35 minutes for tender, barely caramelized squash (great for a soup or puree base); or 35-40 minutes to get crisper, more caramelized edges (great for serving as a side dish or topping salads.)
Beyond the Roasted Basics
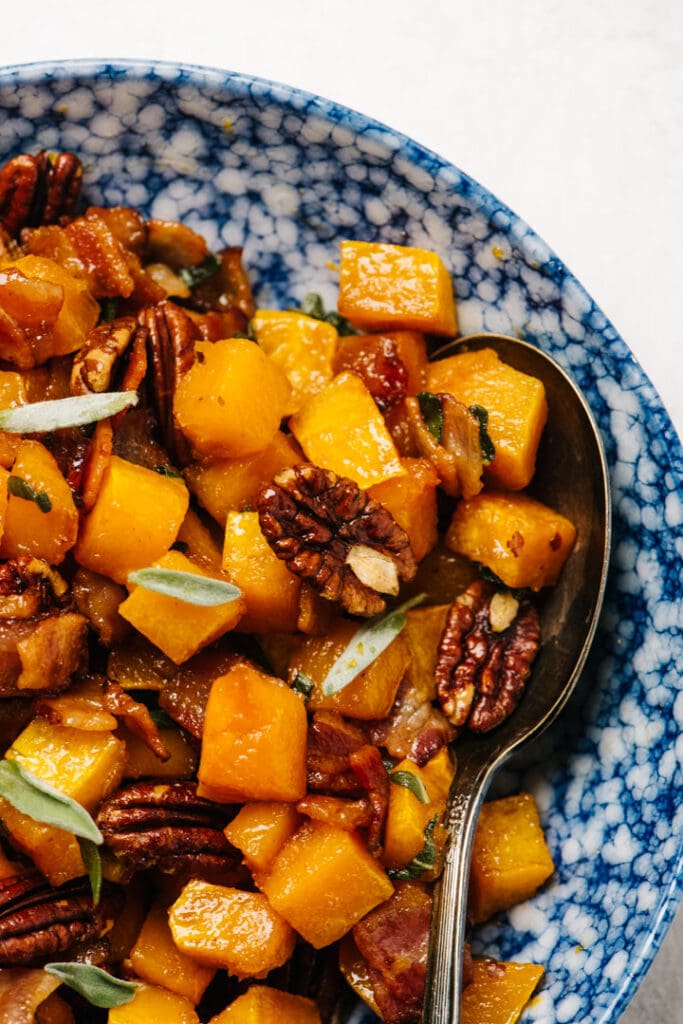
Once you've mastered simple roasted butternut squash, the only way to go is bolder. Go sweet and savory with roasted butternut squash with bacon, toss roasted cubes into a fall panzanella salad, or dice them tiny and make savory mini butternut squash tarts for the perfect holiday appetizer.
Roasted squash is also a terrific base beyond side dishes. Roasting makes the flavor shine, so it's a great cooking method for making a rich roasted butternut squash soup or extra tasty butternut squash mac and cheese.
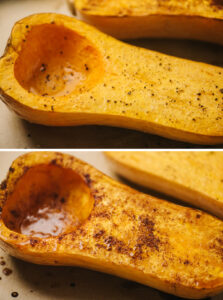
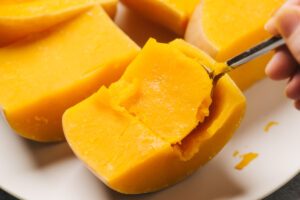
How to Roast Butternut Squash (Halves)
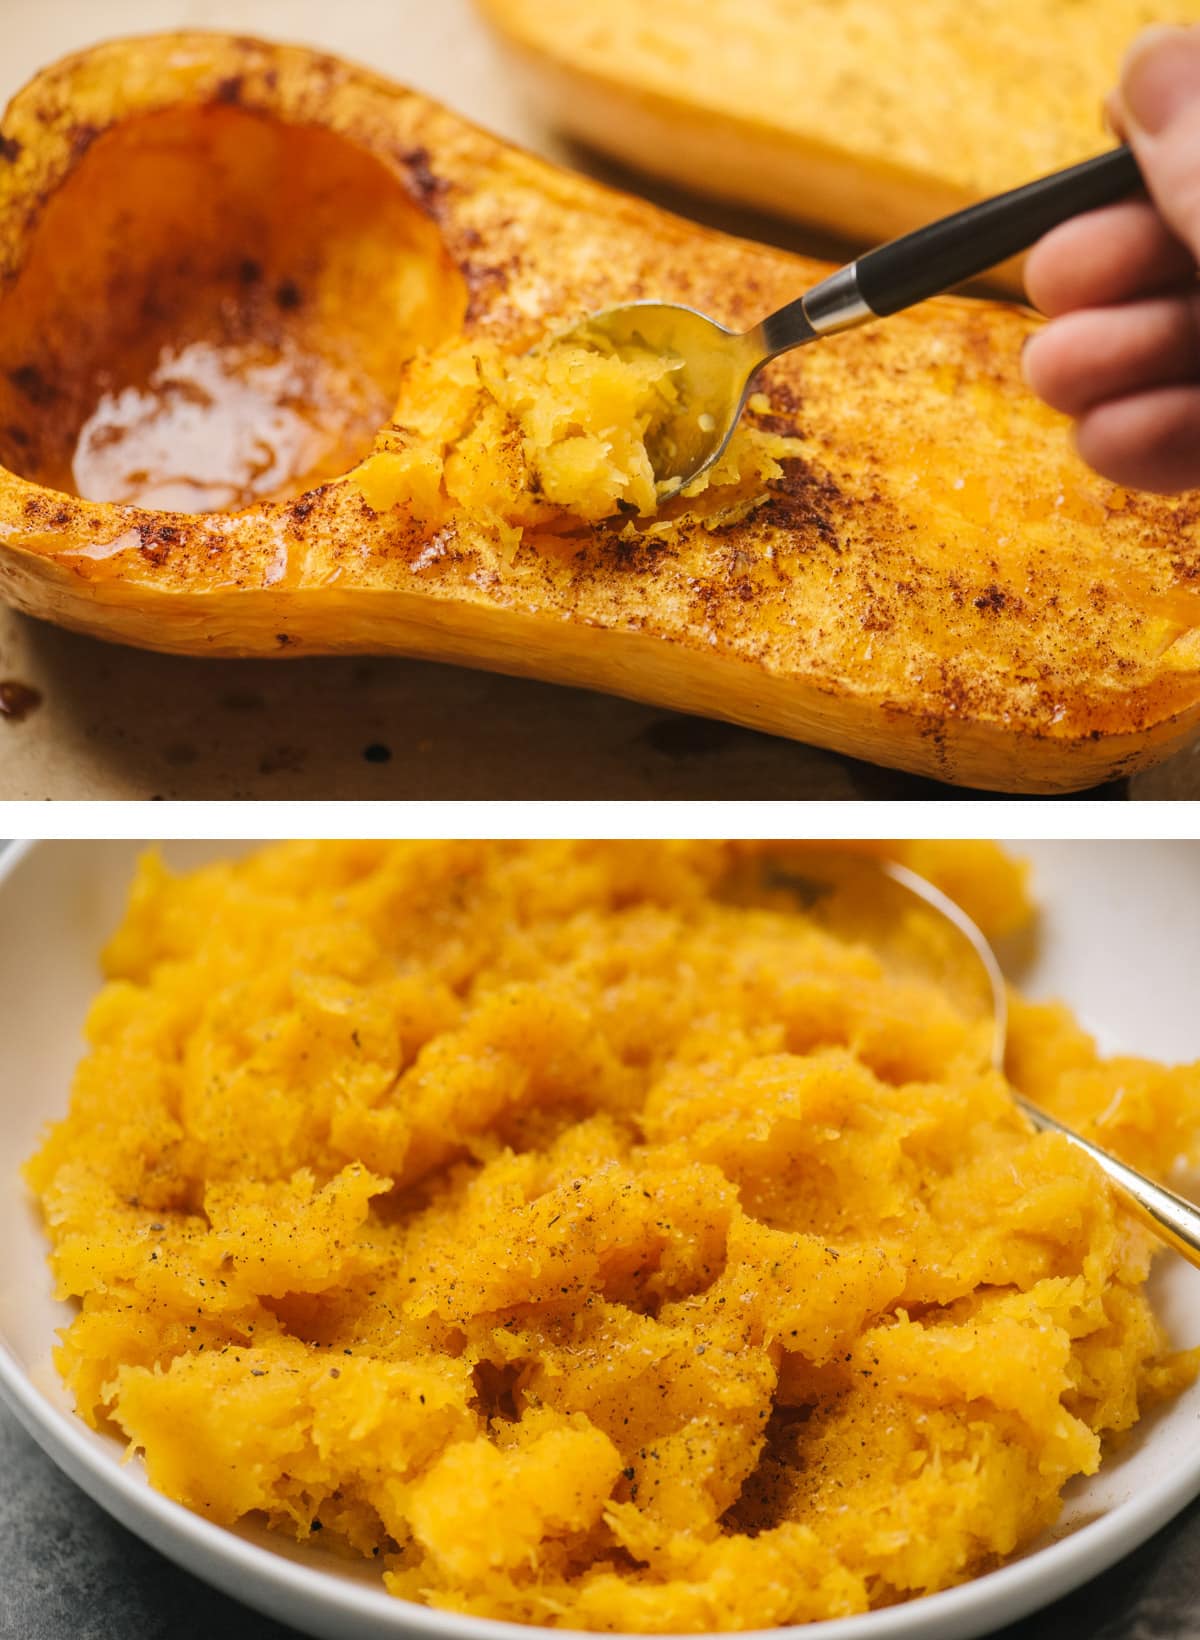
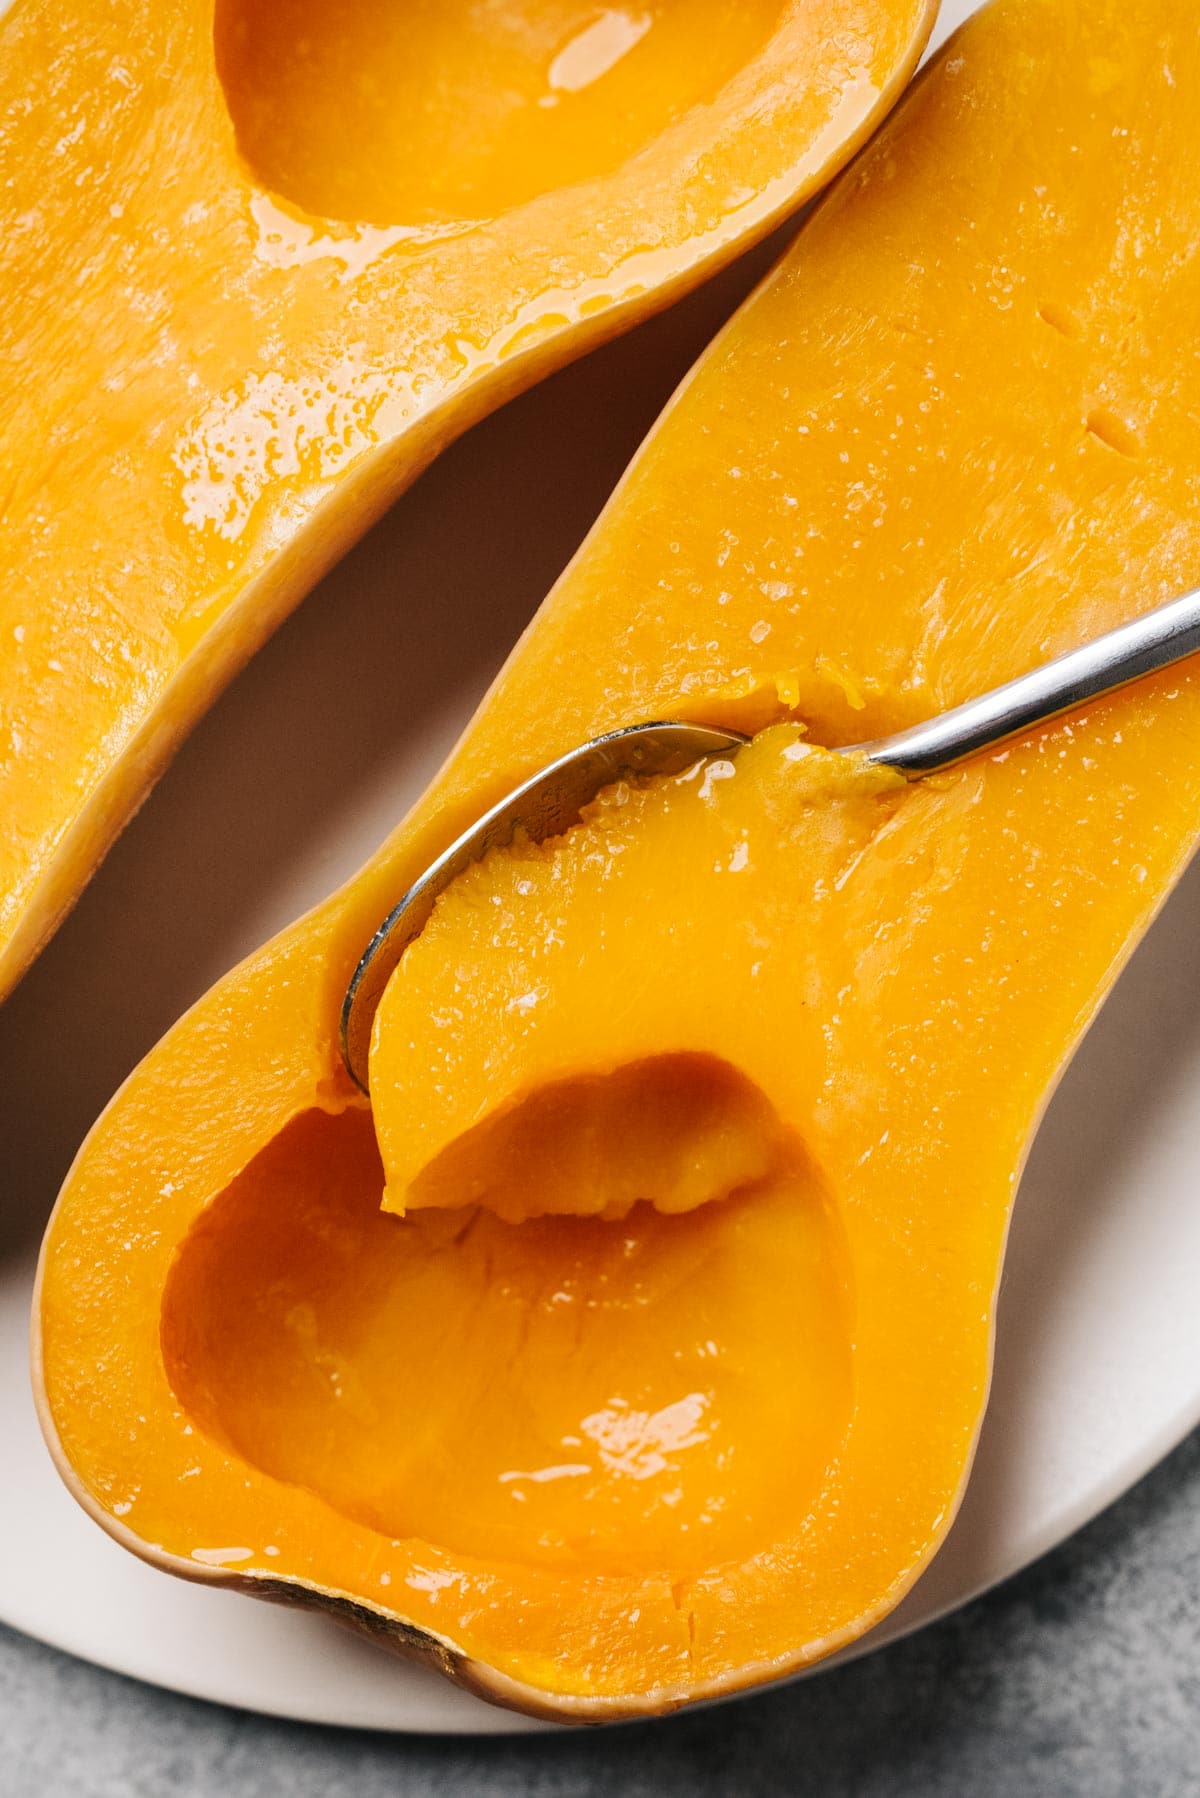
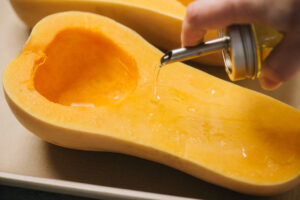
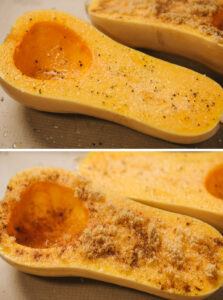
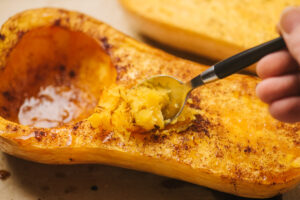
Roasting halved squash allows you to easily achieve soft, caramelly flesh without having to navigate extra chopping or crisped edges. It's best mashed, but don't discount just digging right in and eating it straight from the shell.
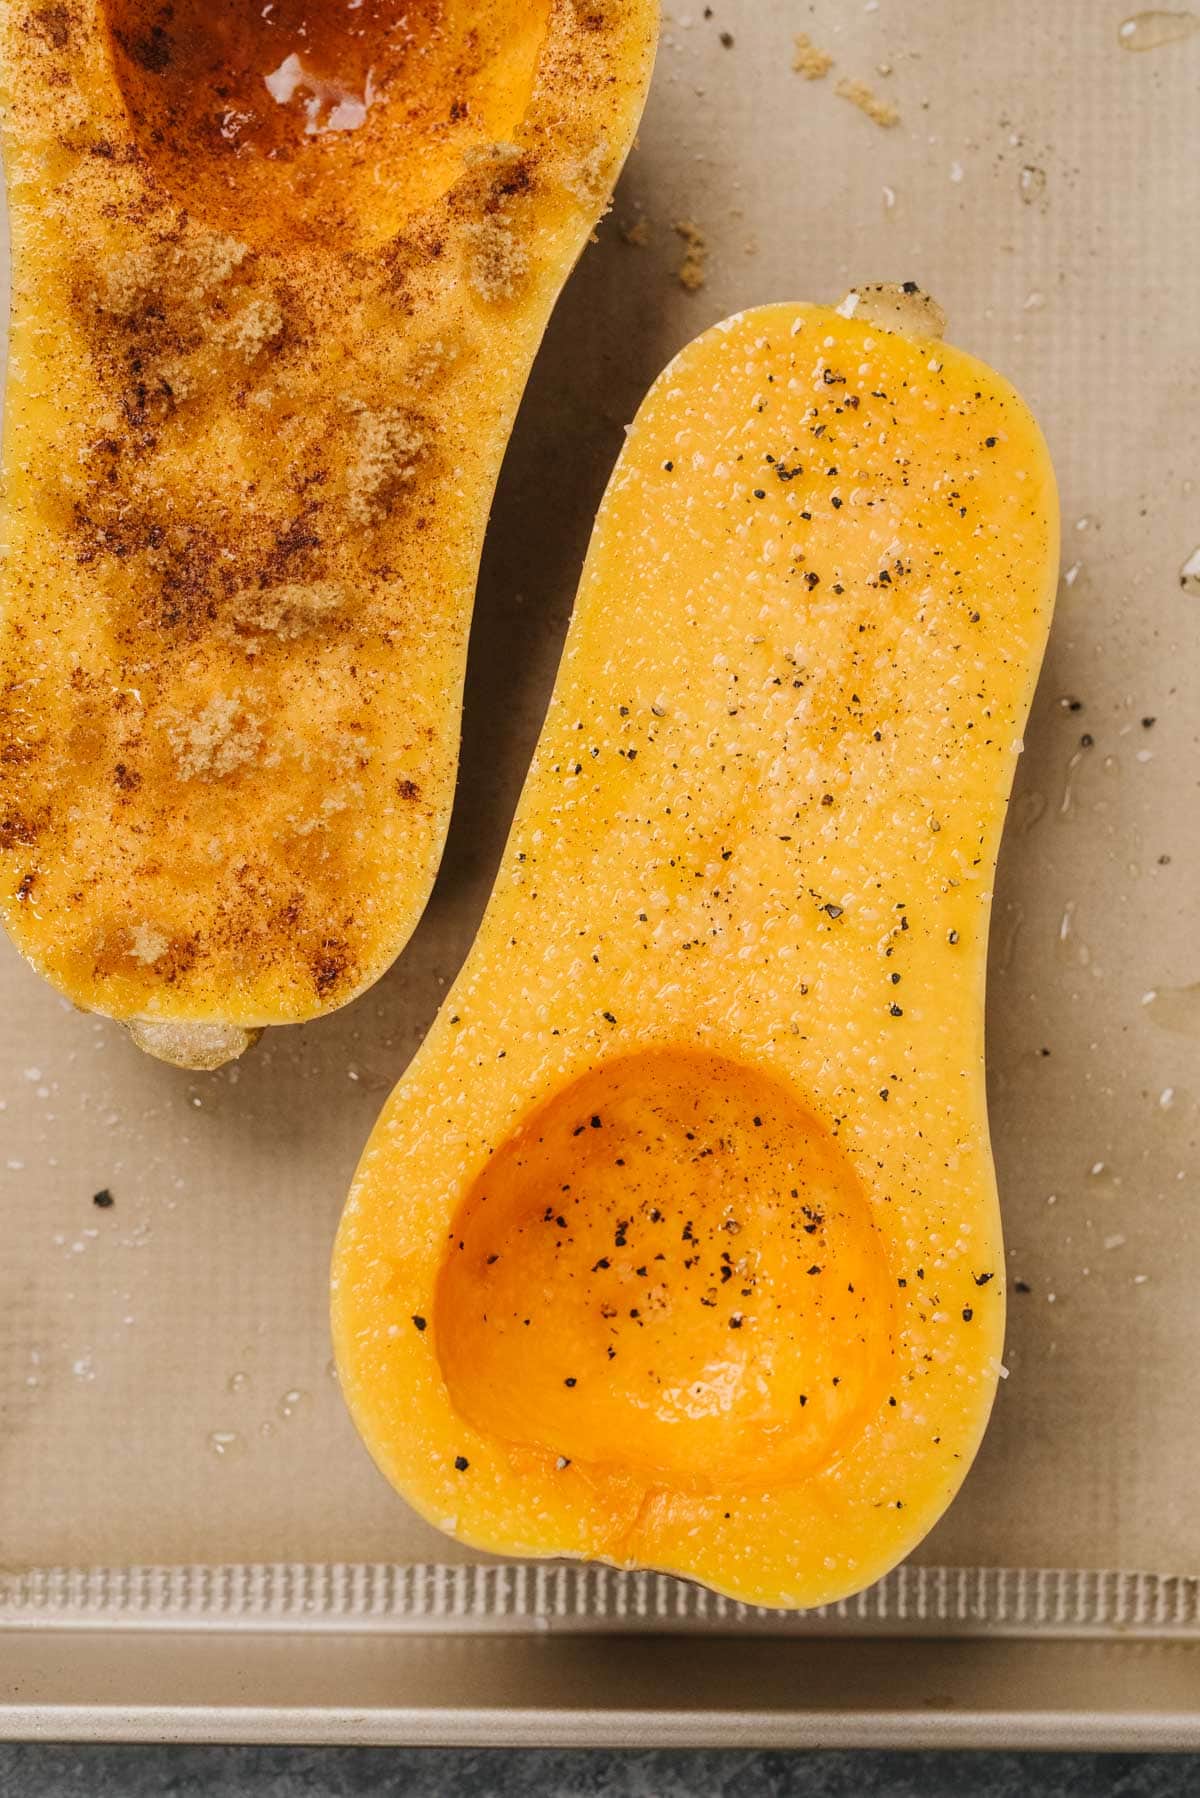
- Gently scrub and dry your squash. Slice in half lengthwise from stem to blossom end.
- Scoop out the seeds and rub with oil.
- Place cut side up on a parchment-lined baking sheet, and season the flesh.
- Roast in a 400°F oven for 50-55 minutes until the flesh is tender and lightly browned.
- Rest five minutes and scoop out the flesh. Mash, season, and serve.
Instead of Mashing, Stuff It!
Roasted butternut squash halves are a tasty edible "bowl". Stuff them with chili (use our healthy chili recipe and omit the sweet potatoes!) or adapt this recipe for sausage stuffed acorn squash.
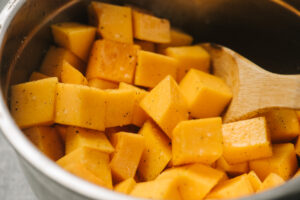
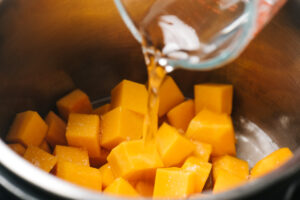
Diced Instant Pot Butternut Squash
If you're a steam-and-season house, fear not. Butternut holds up perfectly in the Instant Pot to get a great side dish with tender, firm bites. It's great tossed with salt, pepper and a splash of olive oil, or if you want to get creative, it pairs beautifully with Indian or Thai sauces.
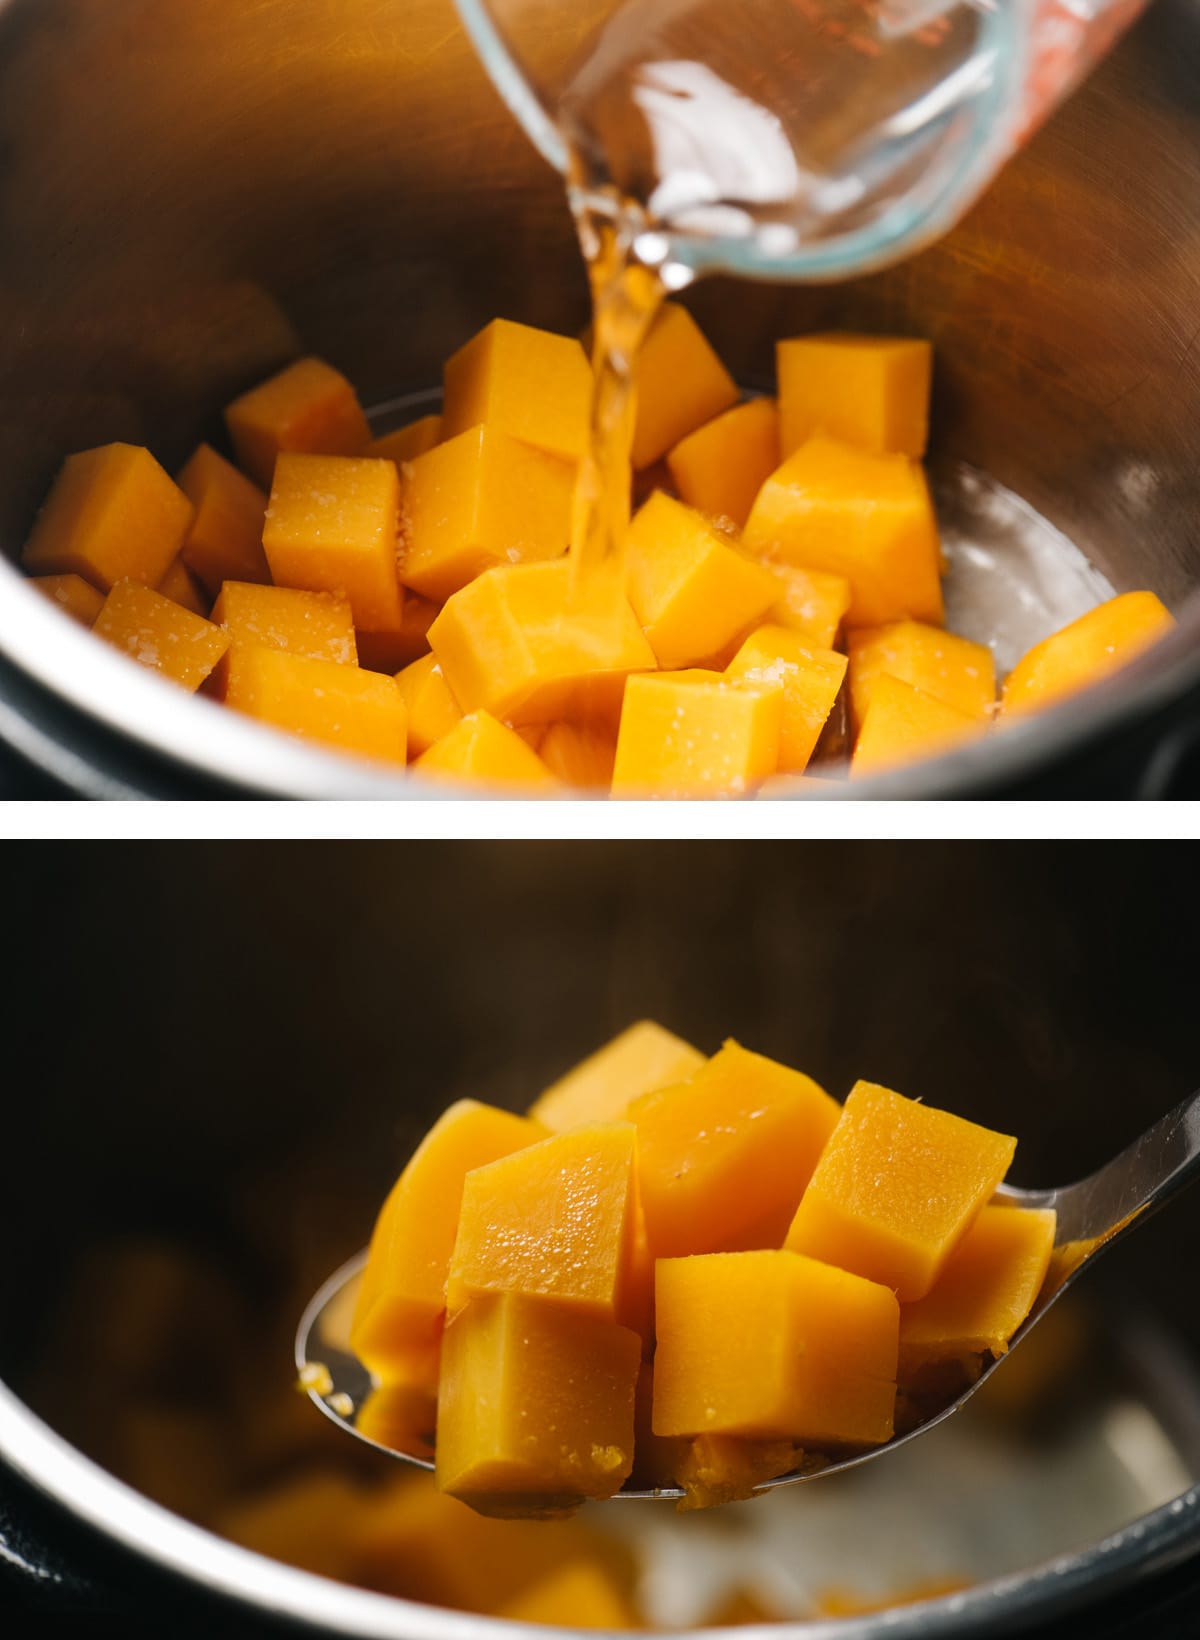
- Place the diced squash into the instant pot. Sprinkle with the salt, then pour in the water.
- Secure the lid and program to 3-4 minutes HIGH pressure - 3 minutes for tender squash that holds its own as a side dish; 4 minutes for soft squash, perfect for soup, purees, and mashes.
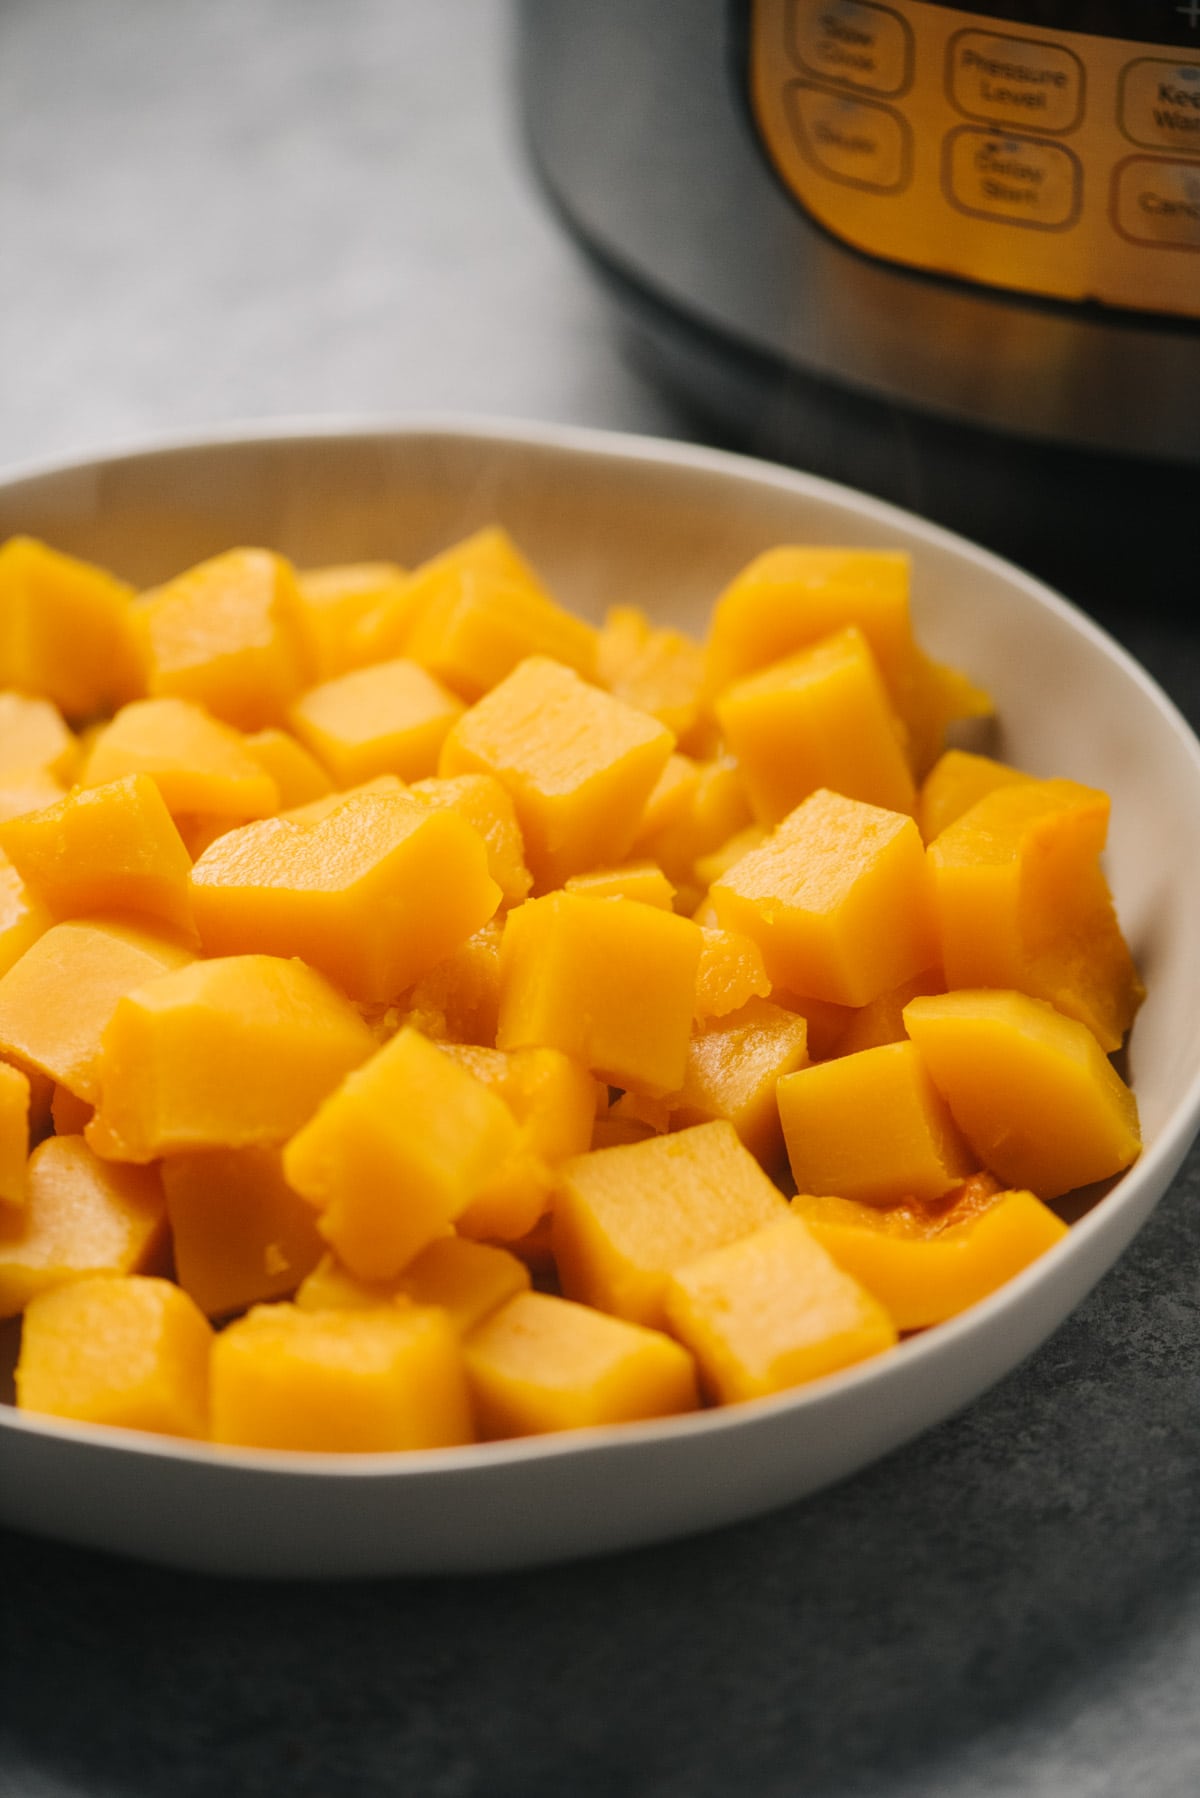
- Use the quick release function and carefully remove the squash using a slotted spoon to drain the squash from the liquid.
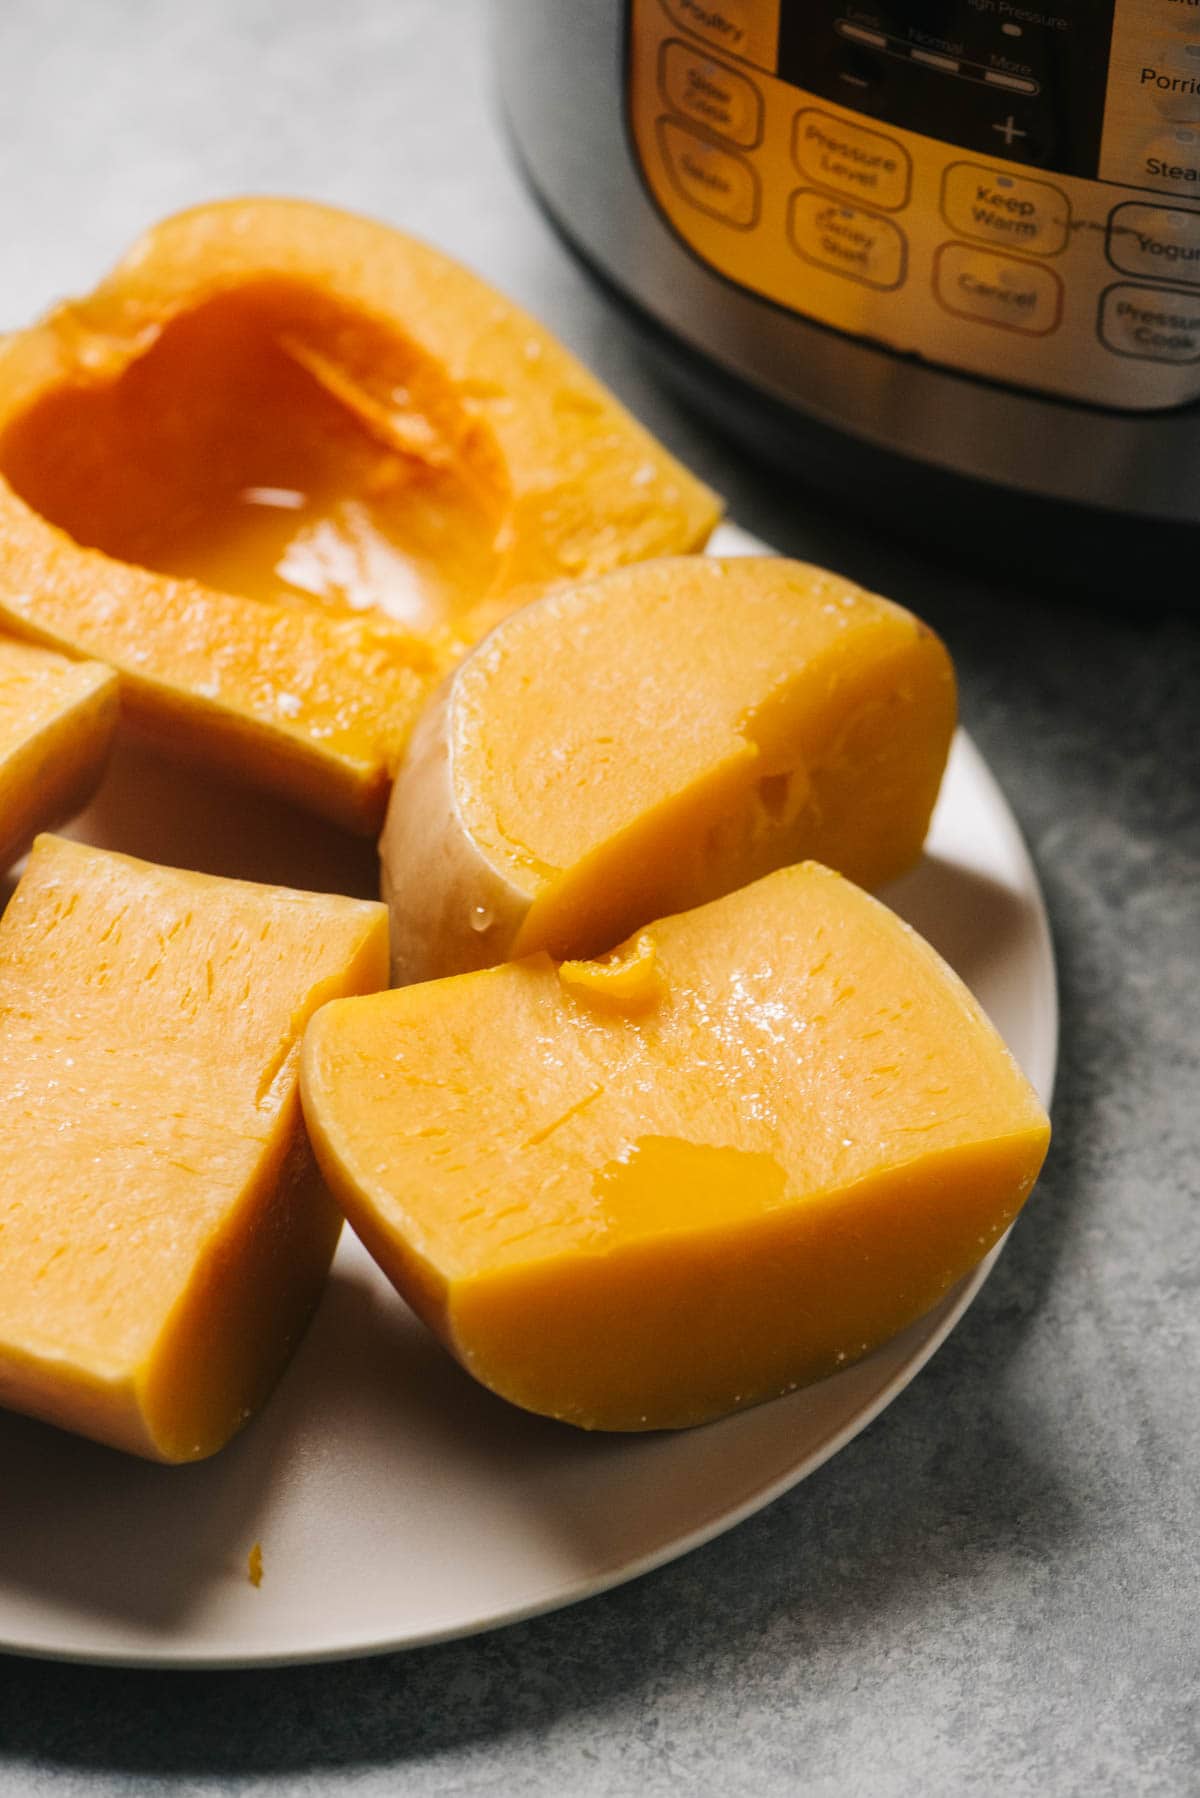
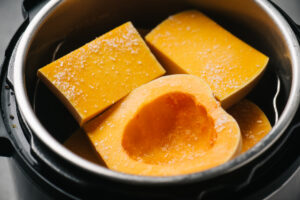
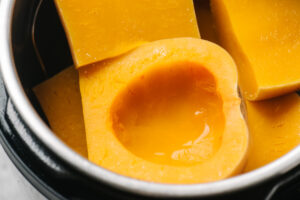
Whole Instant Pot Butternut Squash
Do you love squash? Do you also have ZERO time? Then this method is your new BFF. No muss, no fuss. Toss it in with water and go about your business. This is my go-to for recreating the taste of the frozen squash bricks of my youth.
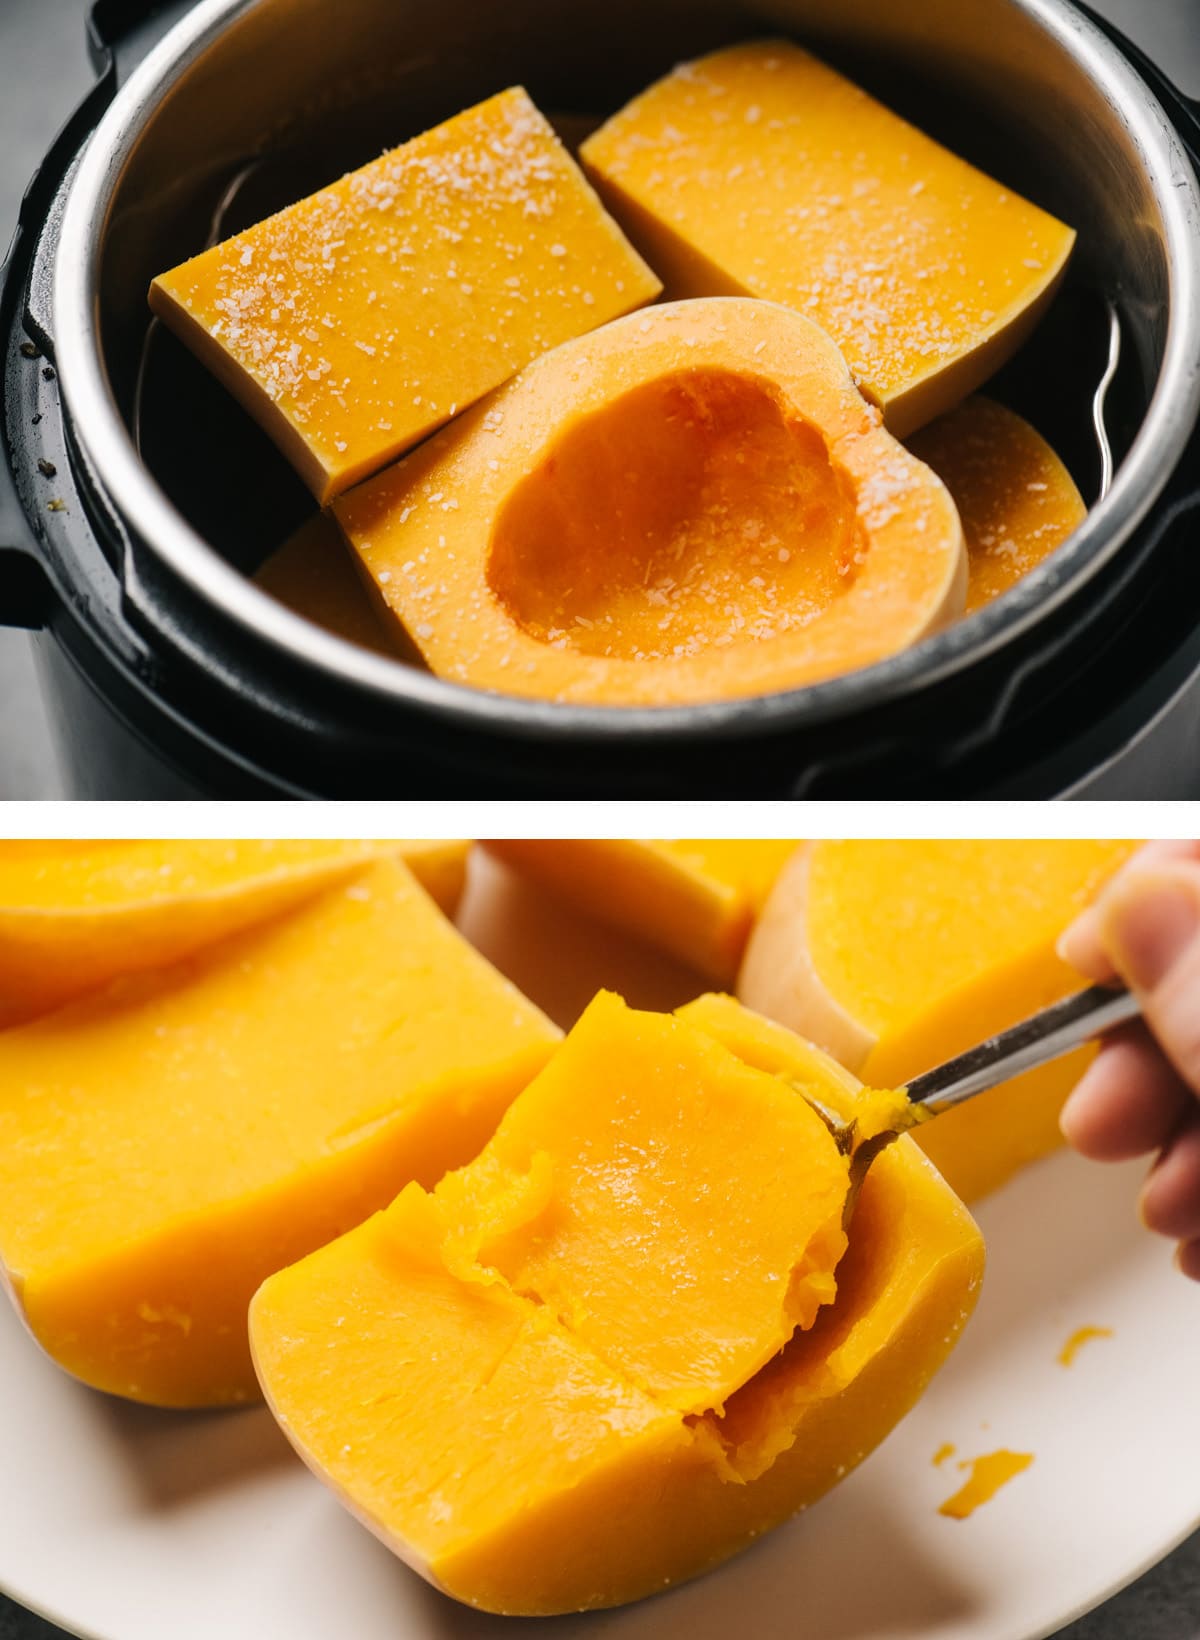
- Gently scrub and dry your squash. Slice in half lengthwise from stem to blossom end, then each half into three equal pieces.
- Add water to instant pot, then arrange the squash pieces atop a trivet, and season.
- Secure the lid and program to 8 minutes HIGH pressure.
- Allow for 5 minutes of natural release before releasing the valve.
- Remove using tongs and allow to cool before scooping out the flesh.
Click the link for a complete post dedicated to butternut squash in the Instant Pot - including even more ways to season and serve!
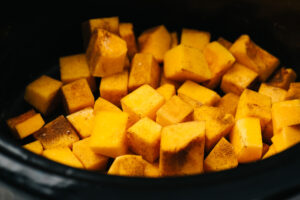
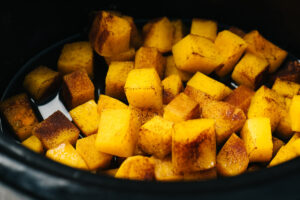
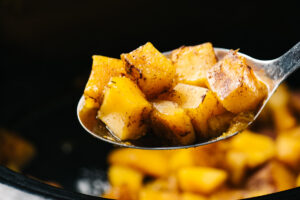
Diced Slow Cooker Butternut Squash
One of my favorite holiday meal tricks is to pretend my slow cooker is an extra oven. Butternut squash is one of a handful of dishes that performs in a crockpot almost exactly like it does in the oven, so this method is perfect for (a) yielding delicious chunks of "roast" squash and (b) freeing up space, time, and your holiday sanity.
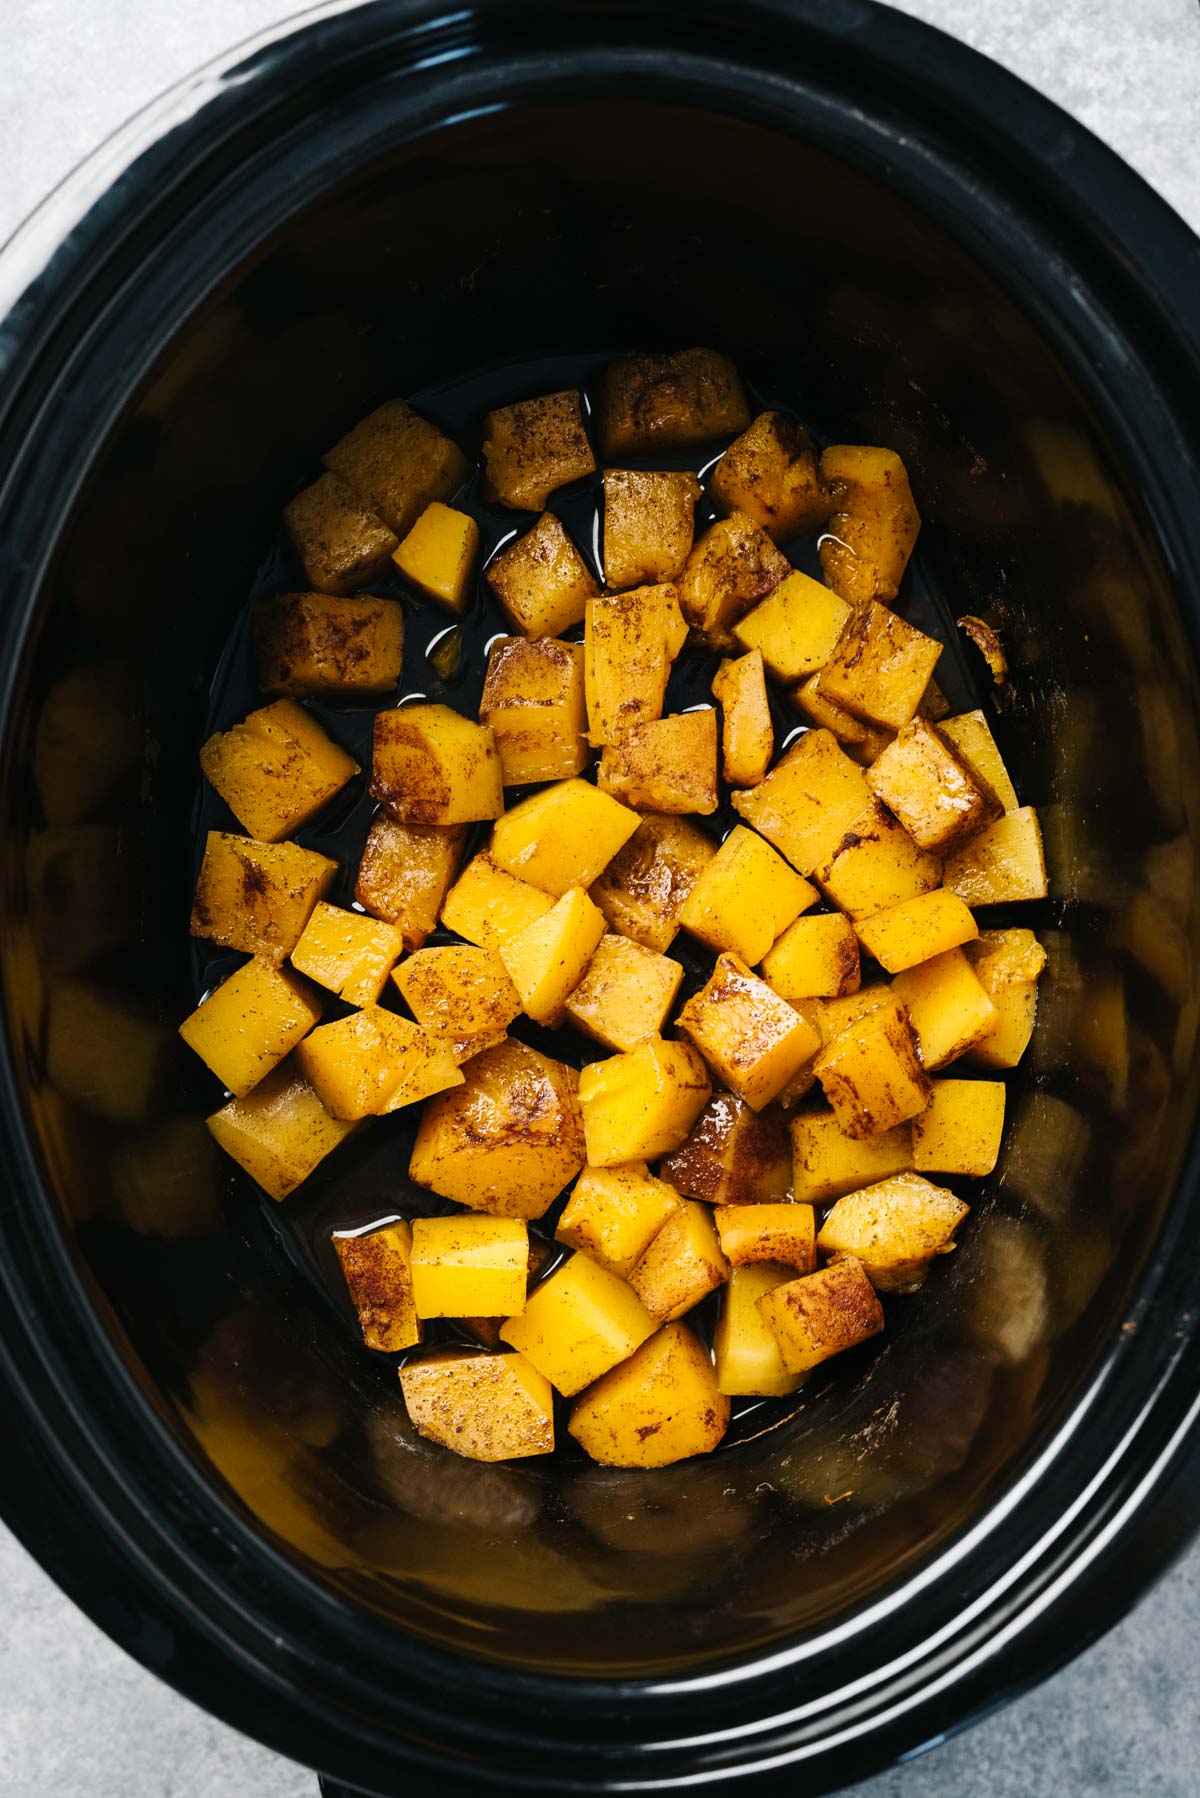
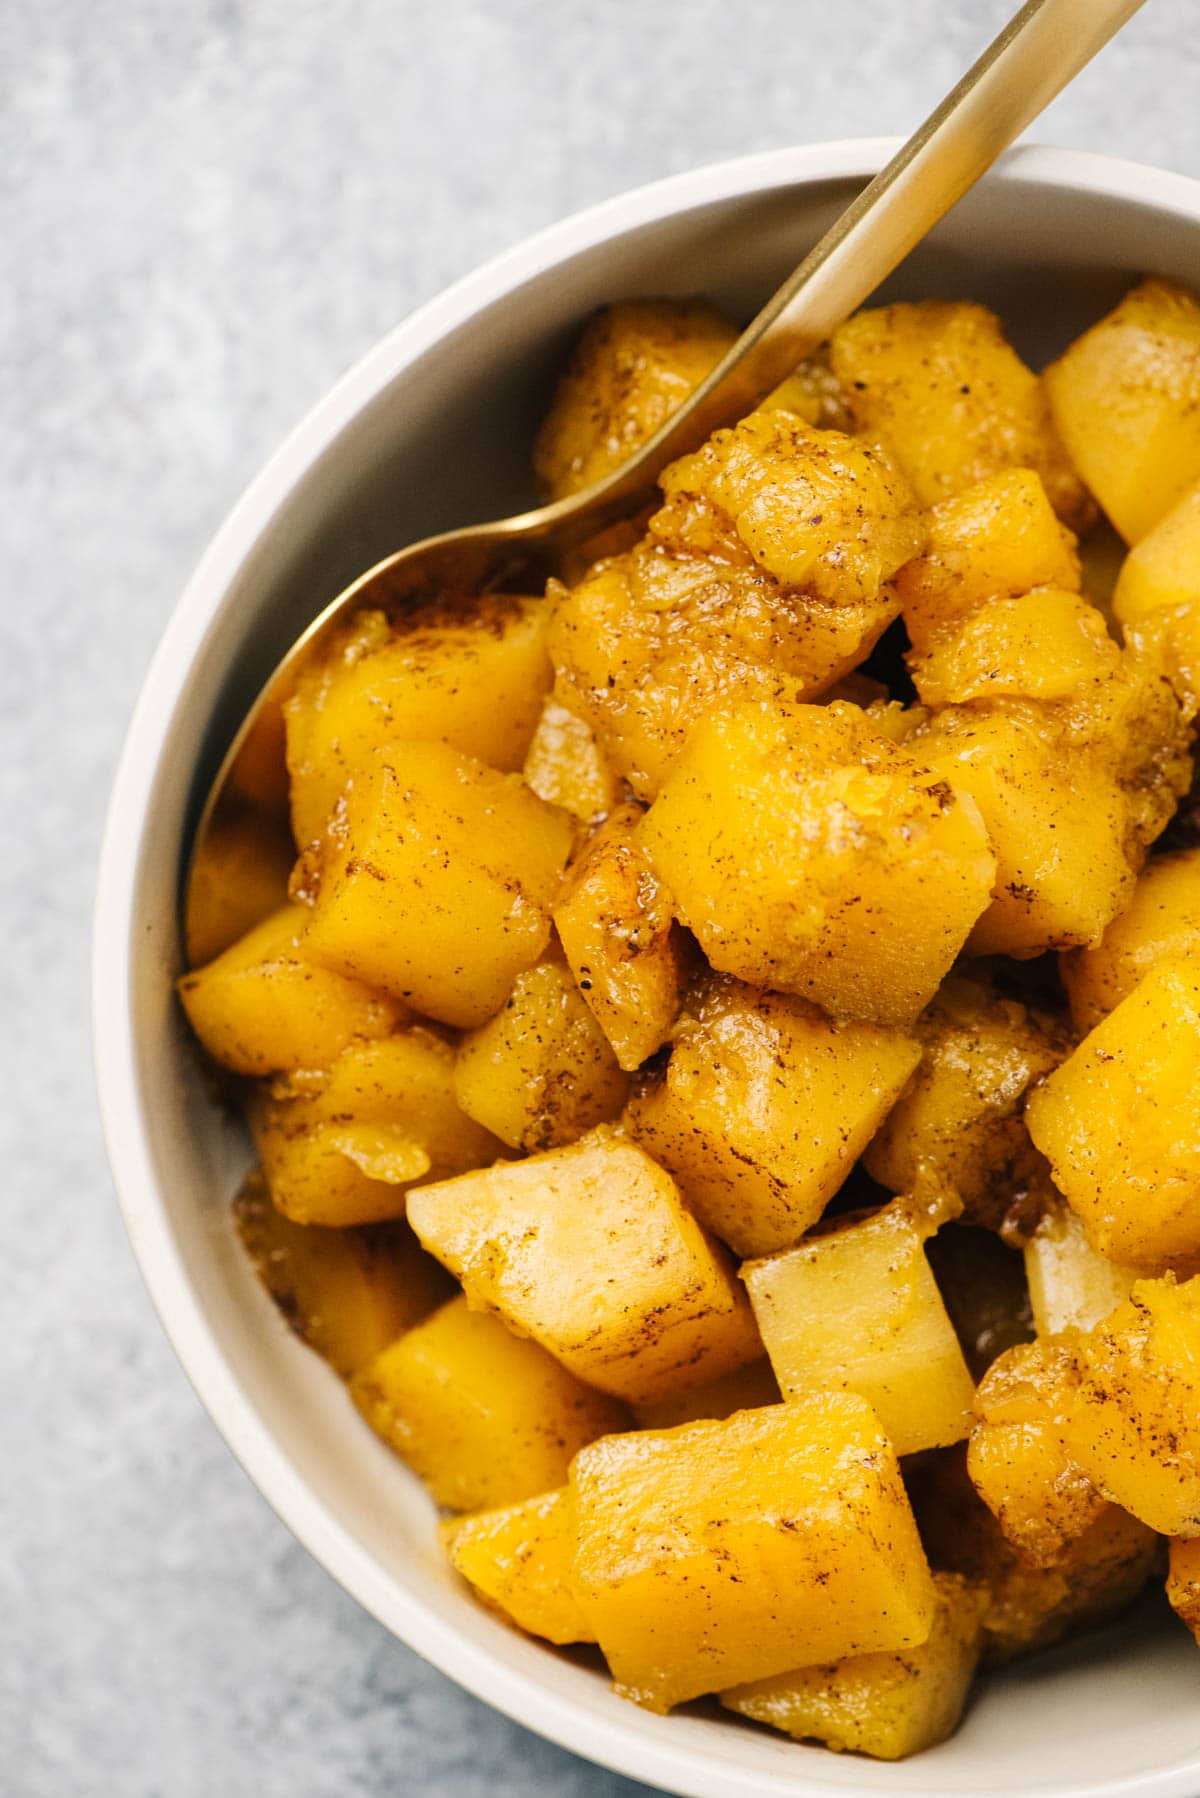
- Place diced squash into the slow cooker. Season and toss to distribute evenly. No water needed.
- Secure the lid and program to HIGH 2 hours or LOW 4 hours.
- Remove using a slotted spoon and serve immediately.
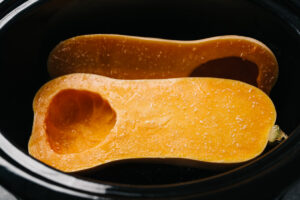
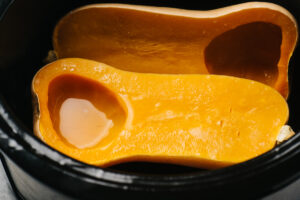
Halved Slow Cooker Butternut Squash
Here's a happy accident for you! I double-booked my Instant Pot one evening, so I tossed my butternut halves in the slow cooker instead... and whaddya know? It turned out to be the perfect happy medium between roasted and steamed. The texture is creamier and more buttery than instant pot squash, plus the flavors really seep in.

- Gently scrub and dry your squash. Slice in half lengthwise from stem to blossom end.
- Place two halves in the bed, cut side up, and season.
- Secure the lid and program to HIGH 2-3 hours or LOW 5-6 hours. (2.5 hours on high yields the most tender, buttery flesh.)
- Remove using tongs and allow to cool before scooping out the flesh. Mash, season, and serve.
Can't get enough crockpot butternut squash? Neither can we - so we wrote a whole post about! Click the linked text to learn how everything you need to know about slow cooker butternut squash, plus tons of ways to season and serve it.
How to Use Cooked Butternut Squash
Clearly, I love this squash as-is, but there are so many ways to incorporate it into your meals and dishes. Most recipes will call for you to prep raw squash in some way before incorporating into a dish. Check first to make sure the right tools are at your disposal.
- If you're serving it on its own as a side dish, we prefer it diced. Any preparation method works, depending on how you like it! Have it your way sweet with roasted butternut squash, pure with Instant Pot squash, or tender and buttery with crockpot squash.
- Serve lightly mashed butternut as a side dish, or a topping for a dish like shepherd's pie.
- Adding to a quick sauce? Steam your squash first to ensure tenderness.
- Butternut squash makes a near-perfect soup! Instant Pot butternut squash soup is extra creamy and silky smooth, while roasted butternut squash soup is sweeter.
Seasoning Suggestions
- Basic Savory: 1 teaspoon kosher salt, ½ teaspoon ground pepper, ½ teaspoon garlic powder, ½ teaspoon onion powder
- Sweet: 2 tablespoons brown sugar or maple syrup, ½ teaspoon cinnamon, ¼ teaspoon nutmeg, and ¼ teaspoon ginger
- Herbed: ½ teaspoon dried sage, ½ teaspoon dried rosemary, ½ teaspoon dried basil, and ½ teaspoon dried thyme
- Global: 1 teaspoon curry powder, ½ teaspoon cumin, ¼ teaspoon coriander, and ¼ teaspoon turmeric
Storage Tips
In the Fridge: Cooked butternut squash (any preparation) will keep in your refrigerator for about 2-3 days. If you're not going to eat and serve immediately, only cook what you need and dice the rest to freeze raw; or, mash your cooked squash before freezing.
In the Freezer: The best ways to freeze butternut squash are as raw cubes, or as a mash or puree. Make sure to use airtight containers. If freezing mashed squash, use ziploc bags and squeeze out as much air as possible before freezing.
More Butternut Squash Recipes to Love!
- Butternut Squash Fries with Maple Aioli
- Butternut Squash and Sweet Potato Fritters
- Vegetarian Ragout with Butternut Squash and White Beans
- Butternut Squash Noodles with Sage Butter
- Whole30 Beef Stew with Butternut Squash
Do you LOVE butternut squash? Leave a comment and below and tell me your favorite way to eat it!
While you're at it, let's be friends - follow me on Pinterest and Instagram for the latest and greatest.
How to Cook Butternut Squash
Description
Ingredients
Roasted Butternut Squash (Diced)
- 1 medium butternut squash (2.5 lb, about 6 cups), peeled, seeded, and diced into 1" cubes
- 1 tablespoon olive oil
- ½ teaspoon kosher salt
- ½ teaspoon ground pepper, optional
- ½ teaspoon cinnamon, optional
- ¼ teaspoon nutmeg, optional
Roasted Butternut Squash (Halves)
- 1 medium butternut squash (2.5 lb), sliced in half, seeds removed
- 2 tablespoon olive oil
- ½ teaspoon kosher salt
- ½ teaspoon ground pepper, optional
- 2 tablespoon brown sugar, optional
- ½ teaspoon cinnamon, optional
Instant Pot Butternut Squash (Diced)
- 1 medium butternut squash (2.5 lb, about 6 cups), peeled, seeded, and diced into 1" cubes
- 1 teaspoon kosher salt
- 1 c water
Instant Pot Butternut Squash (Unpeeled, Quartered)
- 1 medium butternut squash (2.5 lb)
- 1 teaspoon kosher salt
- 1 c water
Slow Cooker Butternut Squash (Diced)
- 1 medium butternut squash (2.5 lb, about 6 cups), peeled, seeded, and diced into 1" cubes
- 1 teaspoon kosher salt
- ½ teaspoon ground pepper, optional
- ½ teaspoon cinnamon, optional
- ¼ teaspoon nutmeg, optional
Slow Cooker Butternut Squash (Halves)
- 1 medium butternut squash (2.5 lb)
- 1 teaspoon kosher salt
- ½ teaspoon ground pepper, optional
- ½ teaspoon cinnamon, optional
- 2 tablespoon brown sugar, optional
Instructions
Roasted Butternut Squash (Diced)
- Heat the oven to 400°F. Line a baking sheet with parchment paper.
- Toss the butternut squash with the olive oil and salt in a large mixing bowl, plus additional seasonings as desired.

- Arrange on the parchment lined baking sheet in a single layer, leaving a bit of space in between each piece.
- Option 1: Roast 30-35 minutes, flipping once halfway through, or until the squash is tender and barely caramelized. At this stage, the squash is great for a soup or puree base.
- Option 2: Roast 35-40 minutes, flipping once halfway through, or until the squash is tender and caramelized around the edges. At this stage, the squash is great for serving as a side dish or topping salads.
Roasted Butternut Squash (Halves)
- Heat the oven to 400°F. Line a baking sheet with parchment paper.
- Gently scrub the skin, then dry. Slice the squash in half lengthwise from stem to blossom end. Scoop out the seeds using a spoon or melon baller. Rub the two halves all over with olive oil.
- Position the squash cut side up on the baking sheet, then season the flesh with salt and pepper, or with salt, brown sugar, and cinnamon.

- Transfer to the oven and roast 50-55 minutes, or until the flesh is tender and lightly browned around the edges.
- To serve, remove from the oven and rest five minutes. Use a spoon to scoop out the flesh and transfer to a large mixing bowl. Lightly mash with a potato masher or the tines of a fork.
Instant Pot Butternut Squash (Diced)
- Place the diced squash into the instant pot. Sprinkle with the salt, then pour in the water.
- Secure the lid, ensure the pressure valve is set to sealing, then program to 3-4 minutes HIGH pressure. It will take approximately 10 minutes for the pot to come to pressure. THREE minutes will yield tender squash that holds its own as a side dish; FOUR minutes will yield very soft squash that is ideal for soup, purees, and mashes.
- Perform a quick release by using a wood spoon to move the pressure valve from sealing to venting; all the steam to escape completely and wait for the float valve to drop. Carefully remove the lid, opening away from you to allow the steam to safely escape.
- Remove the squash using a slotted spoon, or pour into a mesh strainer to drain the squash from the liquid. See notes for serving suggestions.


Instant Pot Butternut Squash (Unpeeled, Quartered)
- Gently scrub the skin, then slice the squash in half lengthwise from stem to blossom end. Use a spoon or melon baller to remove the seeds. Slice each half into three equal pieces.
- Pour 1 cup water into the inner pot, then position a trivet into the inner pot. Arrange the squash pieces onto the trivet, then sprinkle with salt.
- Secure the lid, ensure the pressure valve is set to sealing, then program to 8 minutes HIGH pressure. It will take approximately 15 minutes for the pot to come to pressure.
- Allow the pressure to release naturally for 5 minutes, then manually release the remaining pressure by using a spoon to move the pressure valve from sealing to venting; all the steam to escape completely and wait for the float valve to drop. Carefully remove the lid, opening away from you to allow the steam to safely escape.
- Remove the squash from the instant pot using tongs. Once cool enough to handle, use a spoon to scoop out the flesh and transfer to a large mixing bowl. Lightly mash with a potato masher or the tines of a fork. See notes for seasoning suggestions.
Slow Cooker Butternut Squash (Diced)
- Place the squash cubes into the slow cooker. Sprinkle with salt and pepper, or salt, cinnamon and nutmeg, then toss to evenly distribute. There is no need to add water.
- Secure the lid and program to HIGH 2 hours or LOW 4 hours.
- Remove using a slotted spoon and serve immediately as a side dish.
Slow Cooker Butternut Squash (Halves)
- Gently scrub the skin, then dry. Slice the squash in half lengthwise from stem to blossom end. Scoop out the seeds using a spoon or melon baller. Sprinkle the flesh with salt and pepper, or with salt, brown sugar, and cinnamon. Position the two halves in the slow cooker cut side up.
- Secure the lid and program to HIGH 2-3 hours or LOW 5-6 hours. We found that high 2.5 hours yielded the most tender, buttery flesh.
- Open the lid, and remove the squash using tongs to a cutting board. Once cool enough to handle, use a spoon to scoop out the flesh and transfer to a large mixing bowl. Lightly mash with a potato masher or the tines of a fork.

Recipe Notes
- Basics: salt, pepper, garlic (fresh minced or garlic powder)
- Sweet: brown sugar, cinnamon, nutmeg, ginger
- Savory: sage, rosemary, and fresh basil
- Global: curry, cumin, coriander, marjoram

LUCYG
Thank you, I needed this so much. I’ve been buying already peeled and diced butternut squash, because I had no idea what to do with a whole one. Pinned! Lifesaver! Thanks!