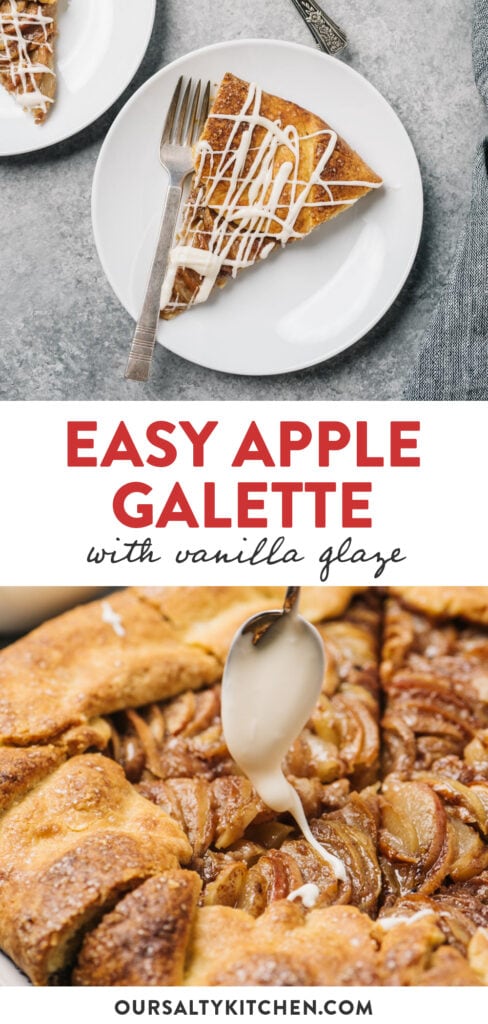
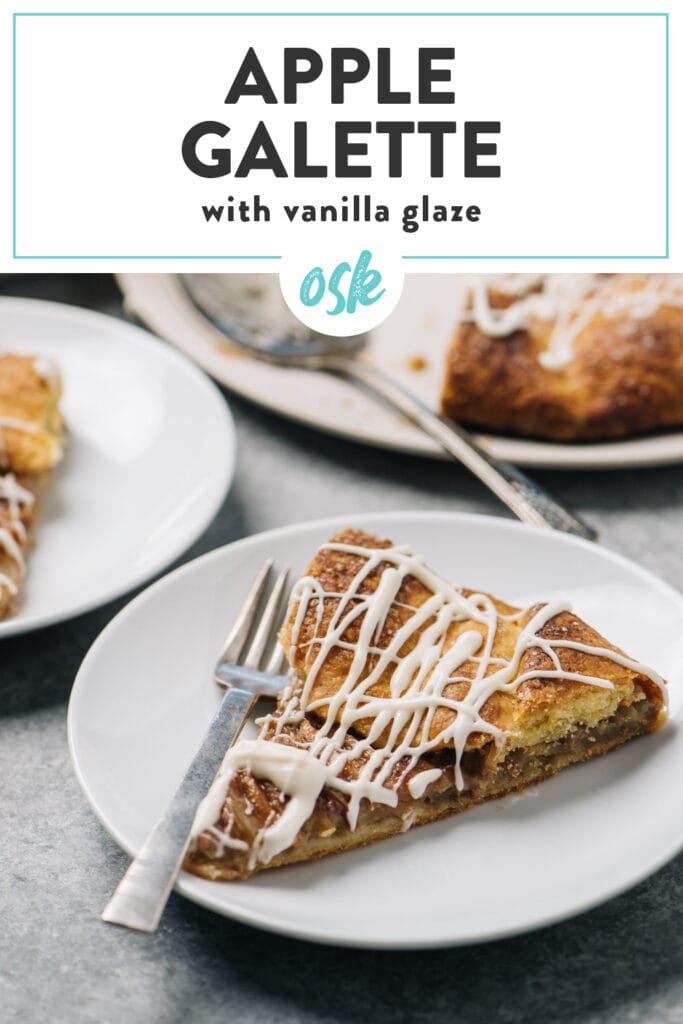
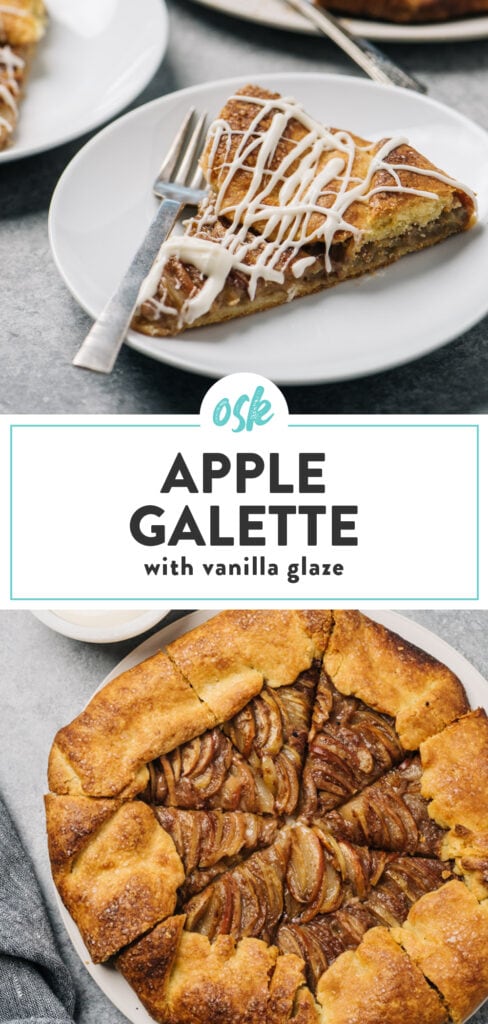
Easy and impressive, our Apple Galette packs all the things you love about everyone's favorite pie into a beginner-friendly dessert recipe. Buttery apples are encased in a flaky, golden brown crust, then drizzled with vanilla glaze. It might be easier than apple pie, but it's just as as delicious!

Jump to:
It's officially fall, y'all. And we know what that means - it's about to get rustic up in these United States of America. Between pumpkin spice and corn mazes and shabby chic decor, we have this winsome (and almost wholly aesthetic) notion of what it means for something to be "rustic".
But when I hear that term my head goes to one place: "Heck yeah, I'm about to cook up some ugly delicious French *bleep*."
Rustic is one of my favorite terms in the culinary lexicon, and it definitely does not mean "peasant food". It does means treasured family recipes with robust flavors using simple, time-honored techniques.
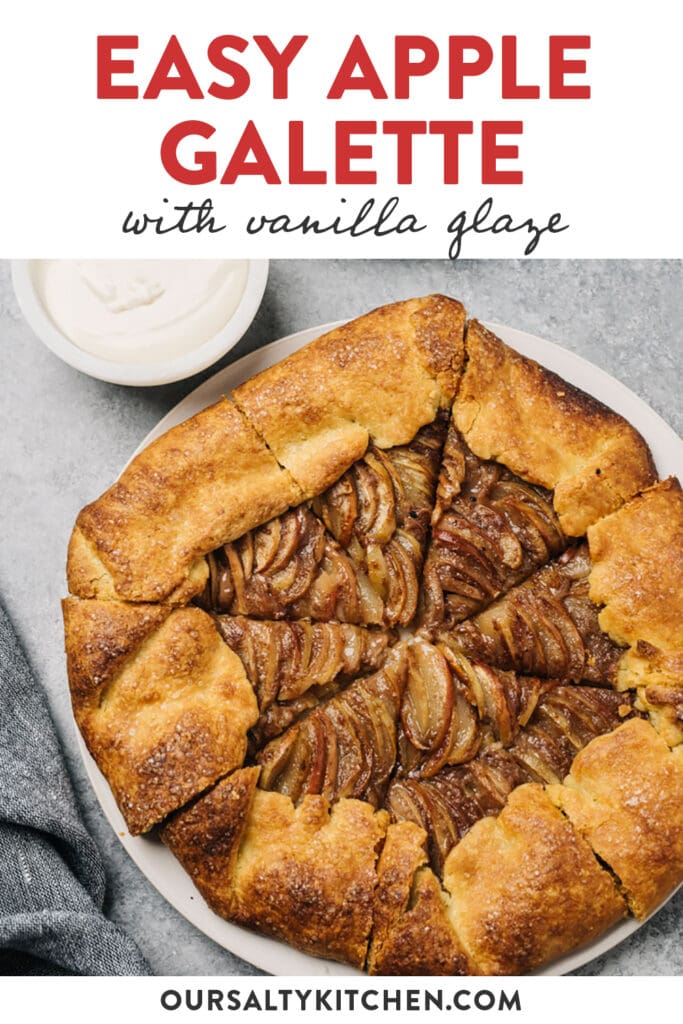
An apple galette just might be the best example of a "rustic" recipe - or at the very least, the best example of a rustic recipe for Americans to consume every fall. Crisp, sweet apples are tossed with brown sugar and warming spices, then encased in an ultra-flaky crust that should absolutely look imperfect.

Galettes Are Perfect for Beginner Bakers
A galette, or as we call it "the lazy lady's pie", is an incredibly easy alternative to pie. If you're new to baking, it's the easiest way to impress with very little fuss.
A galette has everything you love about pie - a flaky, golden brown crust and tender, fruity filling - but in a rustic, free-form tart. The key phrase here is rustic - that means a galette can, and probably should, look messy.
Baking a galette is as easy as one-two-three:
- Roll out pie dough directly onto a baking sheet.
- Pile the filling into the center, and crimp the dough around the edges.
- Bake until golden brown.
Yes, that means you can skip speciality tools like pie plates and weights. You can also skip fussy steps, like par-baking pie crusts and forming lattice tops.
Plus, if you're the kind of pie-person that loves the crust more than the filling, the galette's shallow depth is tailor-made to your taste buds. You can actually pick up a slice and eat it like pizza, and tell me right now who does NOT want to do that with their dessert?
Fun Fact: galettes aren't just for sweets or desserts! Use the exact same technique to create savory galette recipes like our Tomato Galette or Butternut Squash Galette.
How to Make an Apple Galette
Fancy in name, humble in appearance, and absolutely delicious, the galette is an oft overlooked alternative to more complicated pies and tarts. If you're a new baker, our Apple Galette is one of the easiest dessert recipes you can make. Thinly sliced apples are tossed with brown sugar and warming spices, then encased in a flaky, buttery crust.


- Combine flour, cornmeal, and sugar in the bowl of a food processor, then pulse until well-combined.
- Sprinkle cold butter over the dry ingredients, then pulse until the mixture resembles coarse cornmeal.
- Add the egg yolk and pulse until well-combined, then slowly add ice water while pulsing until the dough just barely comes together. The dough should be tacky, but not sticky.
- Transfer the dough to a piece of plastic wrap, form into a disc, then wrap and transfer to the fridge. Chill for at least 1 hour, and up to 24.
- Thinly slice the apples, then toss with flour, brown sugar, cinnamon, nutmeg, and a pinch of salt until evenly coated.
- Roll out the chilled dough into a 12-14" circle; wrap the dough around a rolling pin for easy transfer.
- Position the dough into the center of a baking sheet lined with parchment paper.
- Arrange the apples in the center of the crust, leaving a 2" border all around. Gently fold up the edges of the crust around the apples, crimping lightly wherever the crust overlaps.
- Dot small cubes of butter over the apples. Brush heavy cream onto the edges of the exposed crust, then sprinkle with coarse sugar.
- Bake in a 425°F oven for 40-45 minutes, or until the crust is golden brown and the apples are soft.
Essential Notes and Tips
- When making homemade pie crust, always start with cold ingredients - cube the butter, then place into the freezer for a few minutes, and use ice cold water.
- Furthermore, chill the dough before rolling it out. Plan on at least one hour, and up to 24 hours in advance.
- The secret to flaky pie crust is simple - big chunks of cold butter. When that cold fat his the warm oven, it creates those delicious little air pockets and layers that are the signature of a flaky, buttery pie crust. If you have one, make the crust in a food processor instead of by hand for perfectly sized butter crumbles.
- Use the right apples for baking (see more below), and slice them uniformly thin for even cooking.
- To peel or not to peel - is personal choice! We don't mind the peel, but if you do, peel the apples before coring and slicing.
- Don't overfill the galette. You want to give both the crust and filling some breathing (i.e. cooking) room. Plus, too much fruit could yield too much juice, and you know what that means - soggy bottom!
Use The Right Apples
An apple is an apple is an apple? Not so fast. There is such a thing as baking apples.
Baking apples can handle the heat - they're a bit tarter, so they won't become overly sweet in dessert recipes; and they're more firm that mealy, so they'll hold their shape after baking.
We used Honeycrisp apples, which are on the sweeter side, but are definitely firm. Granny Smith, Pink Lady, Fuji, Galla, Jonagold, and Braeburn are also great baking apples. You may also want to use a combination of two different apples for even more flavor.

That Vanilla Glaze...
There are two schools of thought on toppings: either they exist to enhance dessert, or dessert exists as a polite vehicle to get toppings in your mouth.
This glaze is for those who fit into either category - it's classically sweet, but rich in flavor and body from pure vanilla extract and just a touch of heavy cream (you read that right - cream, not milk).
Drizzle a little or drizzle a lot, but please do drizzle.
Make Ahead Options
There are 3 ways to make this galette ahead of time, either wholly or partially:
- The Dough: make the dough in advance; store in the fridge for up to 24 hours, or in the freezer for up to 3 months; if freezing, thaw in the fridge overnight before rolling.
- The Filling: make the filling up to 48 hours in advance; include a teaspoon of lemon juice to prevent the apples from browning. Store in a tightly sealed container, like a ziplock bag with the air pressed out.
- The Galette: compose the galette (roll out the dough, add the filling, crimp the edges, and dot with butter), but do not brush the crust with heavy cream or sprinkle with coarse sugar. Cover the entire baking sheet tightly with foil or plastic wrap, then transfer to the fridge for up to 24 hours. When you're ready to bake, unwrap the baking sheet, brush on the heavy cream and sprinkle with sugar, then bake as directed.

Did you make this rustic apple galette? We’d love to know how it turned out! Leave a comment and a rating below, or share with your friends and fam!

Rustic Apple Galette with Vanilla Glaze
Description
Ingredients
Pie Crust
- 1 cup all-purpose flour,
- ½ cup cornmeal, see Note 1
- 2 tablespoons sugar
- ¼ teaspoon kosher salt
- ½ cup cold unsalted butter, 1 stick, diced into small cubes; see Note 2
- 1 large egg yolk
- 4-6 tablespoons ice water, see Note 2
- 1 tablespoon heavy cream, see Note 8
- 1 tablespoon demerara sugar, see Note 3
Apple Filling
- 1 pound apples, cored and thinly sliced, see Note 4
- ¼ cup packed light brown sugar
- 2 tablespoons all-purpose flour, see Note 5
- 1 teaspoon cinnamon
- ¼ teaspoon nutmeg
- ¼ teaspoon kosher salt
- 3 tablespoons unsalted butter
Vanilla Glaze
- 1 cup powdered sugar
- 2-3 tablespoons heavy cream
- 1 teaspoon pure vanilla extract
Instructions
For the Crust
- For best results, ensure your ingredients are cold. Lay out a large (at least 24" long) piece of plastic wrap on the counter.
- Combine the flour, cornmeal, sugar, and salt in the bowl of a food processor; pulse 5-10 times, or until well-combined. Sprinkle the butter over the dry ingredients and pulse 10-15 times until the mixture is coarse and resembles cornmeal.
- Add the egg yolk and pulse 4-5 times, or until incorporated. Add 3 tablespoons of ice water and pulse 10-12 times; continue adding the ice water, 1 tablespoon at a time and pulsing 5-10 times after each addition, until the dough forms a loose ball. The dough should be well formed but tacky to the touch; see Note 6. Dust your hands with a light coating of flour, then remove the dough from the food processor and place in the center of the plastic wrap. Fold the plastic wrap over the dough, then form into a flat disc that's approximately 1" thick. Transfer to the fridge and chill until firm - at least 1 hour, and up to 24 hours.
For the Filling
- Core and thinly slice the apples, then transfer to a large mixing bowl. the apples with the sugar, flour, cinnamon, and nutmeg in a large bowl. Toss until the slices are well coated.
- Sprinkle the brown sugar, flour, cinnamon, nutmeg, and salt over the apples, then toss until the apples are evenly coated.
For the Vanilla Glaze
- Combine the powdered sugar with the vanilla extract and two tablespoons heavy cream in a small bowl. Whisk until very smooth; if the glaze is too thick, add more heavy cream one teaspoon at a time; if the glaze is too thin, add more powdered sugar one tablespoon at a time.
For the Galette
- Position a rack in the center of the oven then heat the oven to 425°F. Line a baking sheet with parchment paper.
- Unwrap the dough and place onto a work surface dusted with flour. Roll to a thickness of ¼” in a 12-14” circle; see Note 7. Wrap the dough around the rolling pin and gently transfer to the parchment lined baking sheet.
- Arrange the apples in the center of the dough in an even layer, leaving a 2” border all around. Gently fold the edges up around the filling, lightly pressing where the crust overlaps to ensure it adheres.
- Evenly space the butter over the apples. Using a pastry brush, coat the edges of the dough with heavy cream, then sprinkle with coarse sugar.
- Transfer to the oven and bake 40-45 minutes, until the crust is golden brown and the apples are starting are tender and starting to brown.
- Rest the galette for 10 minutes, then slice using a pizza cutter into 8 wedges. Drizzle with vanilla glaze to taste, and serve warm, right away.
Recipe Notes
- Note 1. Use stoneground (fine) yellow or white cornmeal for best texture. Cornmeal makes the pie crust a bit sweeter and more delicate. If you don't have cornmeal, substitute an equivalent amount of additional all-purpose flour.
- Note 2. The secret to flaky pie crust is to start with cold ingredients and then thoroughly chill the dough. Cut the butter into small (half-inch) cubes, then place into the freezer for 10 minutes. Use ice water - place 4-6 ice cubes into half a cup of water and allow to sit for several minutes until the water is very cold. If you frequently make pie crusts, consider keeping a bag or container of all-purpose flour in the freezer. Lastly, be sure to chill the dough for at least 1 hour, or until very cold and firm.
- Note 3. Demerara sugar is minimally processed and has a coarse texture and large crystals; you might also find it labeled "turbinado" sugar or "sugar in the raw". This coarse sugar is perfect for sprinkling over baked goods like pie crusts or muffins because it will hold it shape while baking.
- Note 4. Use "baking apples" - these varietals are known for being firmer and a bit less-sweet; they'll hold up after baking and won't be overly sweet. Consider using one or a combination of the following - Honeycrisp,. Granny Smith, Pink Lady, Fuji, Galla, Jonagold, and/or Braeburn.
- Note 5. Adding flour to the apples helps the filling thicken; as the apples bake, they will release some juices and those juices will firm up into a jammy texture.
- Note 6. The dough is ready once it easily pulls from the sides of the bowl and clumps into a ball; it should feel tacky, but not sticky - if you press your fingers into the dough, it should pull back mostly clean instead of sticking to your fingers.
- Note 7. Don't stress about creating a perfect circle; you'll be folding up the edges anyway! But do ensure an even thickness so that it bakes evenly.
- Note 8. Heavy cream will give the crust a lighter golden brown finish that's very shiny and slightly softer. For a deeper golden brown or crispiest crust, use an egg wash (whisk an egg white with one tablespoon of water until very smooth).

Comments
No Comments