
Instant Pot Chili (Keto, Whole30)
If you're trying to achieve authentic down-home taste on a tight schedule, THIS is the Instant Pot Chili recipe for you. Layer ingredients and build flavor to create a warm and hearty dish that satisfies tummies and dietary restrictions. Use the saute function on your Instant Pot to brown your meat before adding in peppers, onion and seasoning to create a spicy - but not fiery - base. Then, layer on tomatoes and pressure cook to achieve that slow-cooked taste. Whole30 and Keto friendly with customizable toppings.
Servings 6
Calories 516kcal
Ingredients
- 2 tablespoon olive oil divided
- 1 lb ground beef
- 1 pound ground pork
- ½ - ¾ c beef broth
- 2 tablespoon coconut aminos or Worcestershire sauce
- 1 medium yellow onion finely chopped
- 2 poblano peppers finely chopped
- 1 jalapeno minced
- 4 cloves garlic minced
- 2 tablespoon tomato paste
- 2-4 tablespoon chili powder
- 1 tablespoon cumin
- 1 teaspoon oregano
- 1 teaspoon paprika
- 1 teaspoon kosher salt
- 1 28- oz can crushed tomatoes
Whole30 Toppings
- Diced Avocado
- Diced Red Onion
- Jalapeno Slices
- Vegan Sour Cream
- Cilantro
Keto Toppings
- Sour Cream
- Shredded Cheese
- Avocado
- Cilantro
Instructions
- Press the "Saute" button and wait for the inner pot to fully heat (on some models, it will read "hot"). Add 1 tablespoon olive oil and swirl on the bottom of the pot. Add the beef. Cook the beef and break into small pieces with a wood spoon. As the meat cooks, it will release water content. Every few minutes, tip the residual moisture from the pot into a 1-cup glass measuring cup. Continue cooking until the pot is dry and the beef is well-browned. Remove the beef and set aside in a bowl.
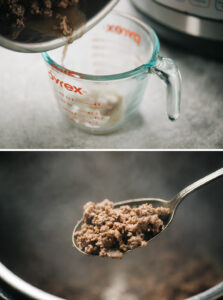
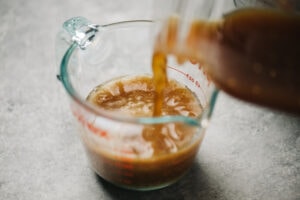
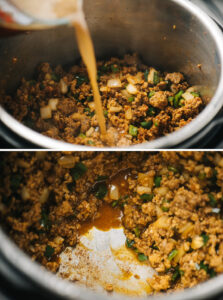
- Add the second tablespoon of olive oil, and repeat this process with the ground pork - breaking up the meat and tipping the release moisture. You should now have 3-4 ounces of liquid reserved in the measuring cup. Pour enough beef broth into the measuring cup to make 1 c total liquid, then add the coconut aminos or Worcestershire sauce to the liquid.
- Return the beef to the pot with the pork, then add the onion, poblano pepper, jalapeno and garlic. Saute, stirring frequently for 3 minutes.
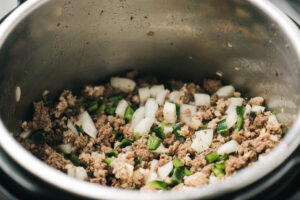
- Add the tomato paste, chili powder, cumin, oregano, paprika, and salt. Work the tomato paste and spices into the meat and vegetables, stirring constantly, for 2-3 minutes.
- Pour the beef broth mixture into the pot to deglaze. Scrape the bottom of the pot until it is clear and no browned bits remain- this is very important. Press the "Cancel" button to turn off the saute function.
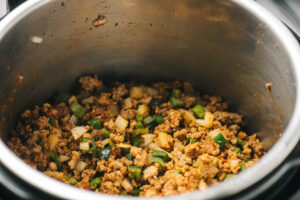
- Pour the crushed tomatoes on top of the beef and vegetable mixture. Do not mix.
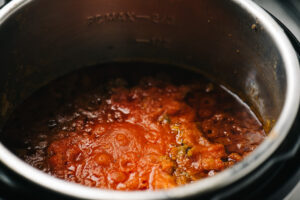
- Seal the lid, ensure the pressure valve is set to "Sealing", and program to 12 minutes high pressure; it will take approximately 10 minutes for the pot to come to pressure. Allow the pressure to release naturally (about 15 minutes) after the pressure cooking cycle has completed. Ensure the float valve has dropped, then open the lid. Stir the chili and taste for seasoning. Adjust with salt as needed. If the chili is too thin, press the "Saute" button and allow the chili to simmer, uncovered, for an additional 5-10 minutes.
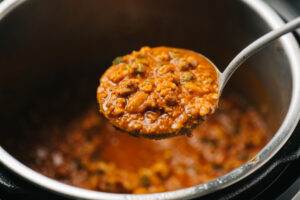
- Ladle into bowls and served with desired toppings.
Notes
- 2 lb 80/20 ground beef can be used in place of the beef and pork mixture; you'll have additional drippings (close to 5-6 ounces).
- Substitute green bell pepper for the poblano based on preference or availability.
- Keep some or all seeds from the jalapenos for additional heat.
- Fridge: store chili in an airtight container for 3-4 days. Move to the freezer after that.
- Freezer: scoop leftover chili into ziploc bags for flat freezer storage, or store in an another freezer-safe container; store for up to 3 months.
- To Reheat: defrost in the refrigerator overnight. Warm on the stove in pot over medium heat to avoid "re"cooking the meat. For a quicker defrost, submerge your sealed ziploc into a bowl of cool water, changing it when the water comes up to room temperature. Repeat for 30 minutes until chili has softened, then transfer to a pot on the stovetop for warming.
Nutrition
Calories: 516kcal | Carbohydrates: 19g | Protein: 28g | Fat: 40g | Saturated Fat: 1g | Polyunsaturated Fat: 1g | Monounsaturated Fat: 3g | Trans Fat: 0g | Cholesterol: 0mg | Sodium: 1076mg | Potassium: 717mg | Fiber: 5g | Sugar: 9g | Vitamin A: 25% | Vitamin C: 59% | Calcium: 11% | Iron: 13%